
Extract Email Data in Power Automate is one of the simplest yet most powerful techniques to automate form submissions, contact messages, and inquiry handling. In this tutorial, you’ll build a clean, dependable workflow that extracts structured data from email body text and saves it directly into a SharePoint list – using only split and trim functions. No AI, no premium connectors, no third party tools.
🚀 Whether you’re managing customer forms, website contact emails, or internal requests, this automation will save time, eliminate manual work, and ensure consistent data entry every single time.
🚀 What You’ll Achieve
Using Extract Email Data, you’ll be able to:
- Convert free text emails into structured SharePoint list items
- Automate inquiries without relying on AI or complex parsing tools
- Build a clean and fast workflow using only split and trim expressions
- Ensure consistent, error-free data extraction every time
- Trigger automation instantly when an email arrives
🧰 Prerequisites
Before you begin with Extract Email Data in Power Automate, make sure you have:
- Access to Microsoft 365 with Power Automate
- Permission to create a SharePoint list
- A mailbox where emails follow a fixed structure like this:
Name: Danish Ali
Email: danish@test.com
Contact No: 111222333
Message: Hello I want to know about your power automate solutions
And want to learn more about them
Thanks
🧱 Step-by-Step: Create the Extract Email Data Flow
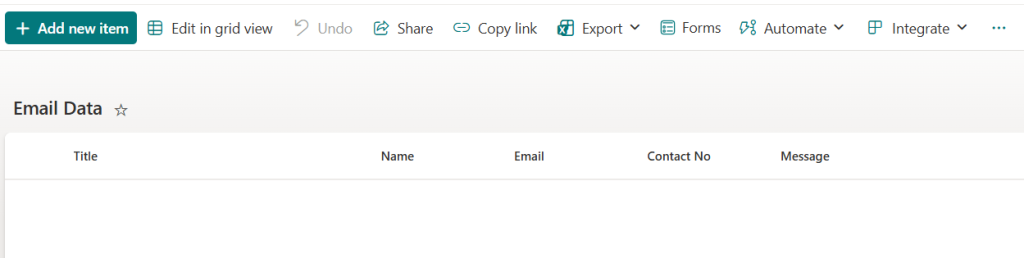
🔹 Step 1: Create a SharePoint List
Create a SharePoint list with the following columns:
- Name
- Contact No
- Message
This is where all parsed email data will be stored.
🔹 Step 2: Start a New Automated Cloud Flow
Go to make.powerautomate.com
Select Create > Automated Cloud Flow
Trigger: When a new email arrives (V3)
Give your flow a name like:
Extract Email Data
Click Create.
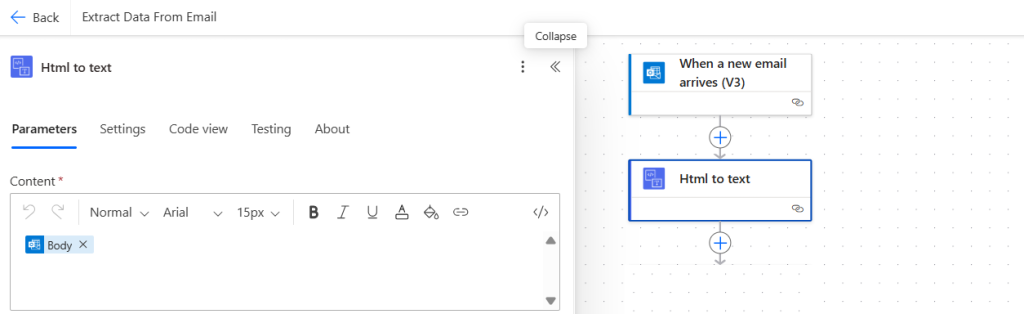
🔹 Step 3: Convert Email Body to Plain Text
Add action: Html to text
This ensures all formatting is removed before extracting values.
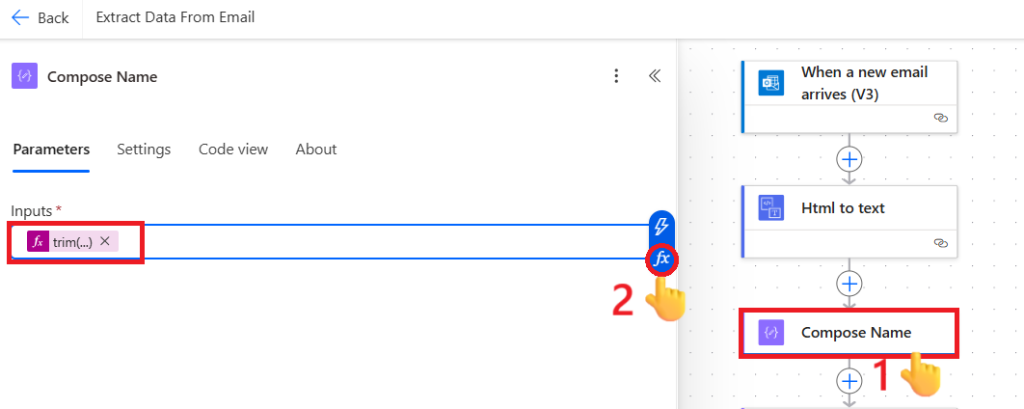
🔹 Step 4: Extract Name
Add action: Compose
Rename it to Compose Name
Expression:
trim(split(split(body('Html_to_text'),'Name:')[1],'Email:')[0])
🔹 Step 5: Extract Email
Add action: Compose
Rename: Compose Email
Expression:
trim(split(split(body('Html_to_text'),'Email:')[1],'Contact No:')[0])
🔹 Step 6: Extract Contact No
Add action: Compose
Rename: Compose Contact No
Expression:
trim(split(split(body('Html_to_text'),'Contact No:')[1],'Message:')[0])
🔹 Step 7: Extract Message
Add action: Compose
Rename: Compose Message
Expression:
trim(split(body('Html_to_text'),'Message:')[1])
This will extract everything after the keyword Message: including multiple lines.
🔹 Step 8: Create Item in SharePoint
Add action: Create item
Select your SharePoint site
Select the SharePoint list you created
Under Advanced parameters, map the fields:
- Name → Output of Compose Name
- Email → Output of Compose Email
- Contact No → Output of Compose Contact No
- Message → Output of Compose Message

🔹 Step 9: Test the Flow
Send an email to your mailbox following the same structure.
Run the flow and check your SharePoint list – you should see the extracted data neatly added as a new item.

📈 Bonus Tips
🔧 Keep Email Format Consistent
The Extract Email Data in Power Automate technique relies on predictable labels like Name: and Email:.
Even a small change may affect results.
💡 Add Error Handling
Optionally add conditions to check:
- If parts are missing
- If values are blank
- If data contains unexpected characters
🚀 Extend the Automation
After extracting email data, you can:
- Send a confirmation email
- Notify Teams
- Start an approval
- Log data into Excel or Dataverse
🏁 Wrapping Up
Your Extract Email Data flow is now fully functional – fast, reliable, and easy to maintain. By using simple functions like split and trim, you avoid complexity while keeping complete control over your data extraction logic.
This powerful automation ensures clean, structured data in your SharePoint list without manual effort, boosting accuracy and saving time every day.