
3 Effortless Steps to Save Email Attachments to Teams can completely change the way you handle incoming files. Instead of dragging and dropping attachments manually, Power Automate can deliver them straight into your chosen Teams channel automatically.
🧰 What You’ll Need
- A Microsoft 365 account with Outlook and Teams
- A Team + Channel where you want the files to appear
- Power Automate access
✅ How to Implement the Save Email Attachments to Teams
🔹 Step 1: Create a New Automated Flow
- Go to make.powerautomate.com → My Flows → New Flow → Automated Cloud Flow
- Name it: “Save Email Attachment to Teams Channel”
- Search for “new email” and select When a new email arrives (V3)
- Click Create
🔹 Step 2: Configure the Trigger for Attachments
Inside the trigger:
- Expand Advanced parameters
- Set Include Attachments = Yes
- Set Only with Attachments = Yes


This ensures the flow only runs for emails that actually contain attachments and automatically includes the attachment content. It’s an essential part of to Save Email Attachments to Teams.
🔹 Step 3: Add “Create File” Action for Teams Channel
- Click the + icon below the trigger
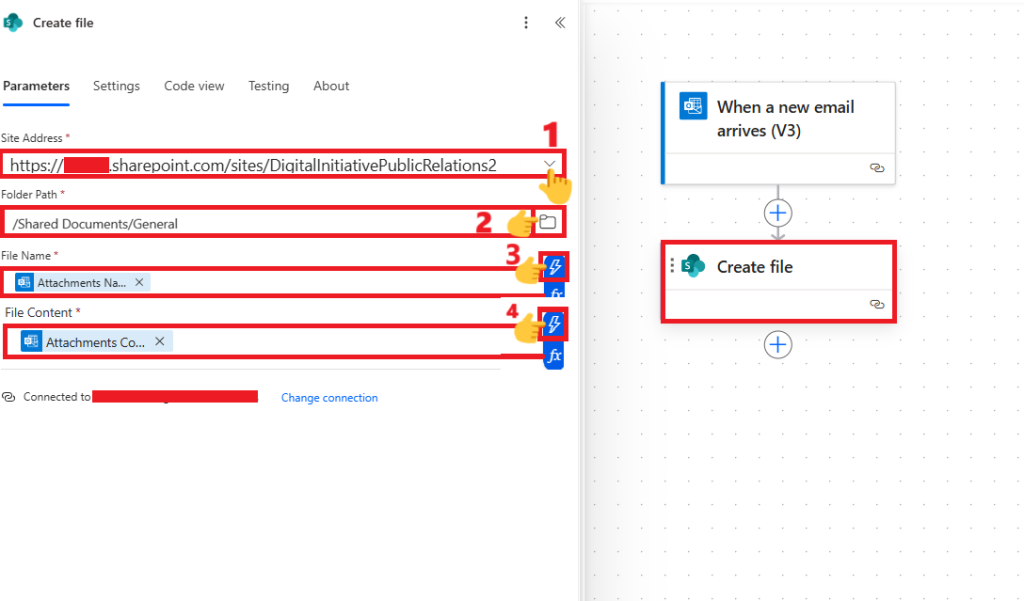
- Search for Create file under SharePoint
- In Site Address, choose the Team’s connected SharePoint site
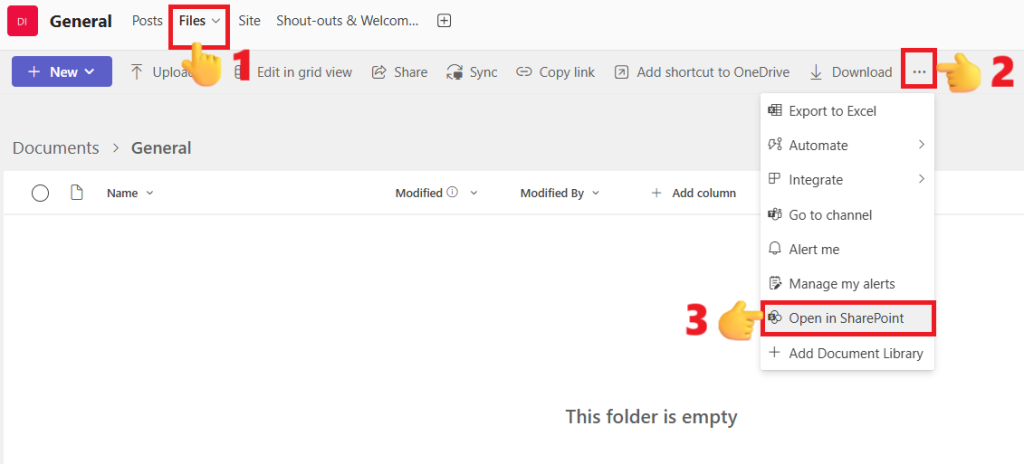
- If the site is not listed:
- Go to the Teams channel.
- Open the Files tab.
- Click the three dots (⋯) at the end of the document library toolbar.
- Select Open in SharePoint.
- This opens the document library for that Teams channel in your browser.
- Copy the SharePoint site URL from the address bar and paste it into Site Address as a custom value.
- Note: Do not copy the entire URL – only copy the portion up to (but not including)
/Shared Documents.
- If the site is not listed:
- In Folder Path, browse to /Shared Documents/<Channel Name> (each channel has its own folder here)
- If there are multiple channels, each channel will have its own folder. Select the one where you want to save by clicking the folder icon, then navigating to Shared Documents → <Channel Name>.
- File Name: Select Attachments Name by clicking on flash icon, the icon will appear there when you click inside the File name field
- File Content: Select Attachments Content by clicking on flash icon, the icon will appear there when you click inside the File name field
💡 Power Automate will automatically wrap this in an Apply to each loop to handle multiple files from the same email. This finalizes Save Email Attachments to Teams.
🔹 Test the Flow
- Click Save
- Send yourself a test email with attachments
- Open the Teams channel’s Files tab to confirm the upload
🔹 Optional Filtering
Refine the trigger with filters:
- From = a specific sender (e.g., invoices@vendor.com)
- Subject Filter = only run if the subject contains “Invoice”
This keeps your automation relevant and avoids unnecessary runs while still benefiting from 3 Effortless Steps to Save Email Attachments to Teams.
🎯 Why This Works
By using “Include Attachments” + “Only with Attachments,” you:
- Skip the extra Get Attachments action
- Avoid Condition blocks
- Keep the flow clean and fast
Your attachments now show up automatically in the Teams channel Files tab – no more manual dragging and dropping.
🚀 Bonus
Every Teams channel folder is just a SharePoint library under the hood. This trick works because you’re writing directly to that folder. You can reuse the same pattern for: