
Create Power Automate Flow easily using this beginner-friendly guide with 6 simple steps. Whether you want to automate daily tasks or streamline business processes, Microsoft Power Automate helps you do it without coding. In this tutorial, you’ll learn how to create Power Automate flow using pre-made templates.
What is Power Automate Flow for Beginners?
Power Automate Flow for Beginners is a simple way to understand how to automate tasks between apps like Outlook, SharePoint, Teams, Excel, and more. You don’t need to be a developer — Power Automate provides pre-built templates that make creating workflows easy, fast, and efficient.
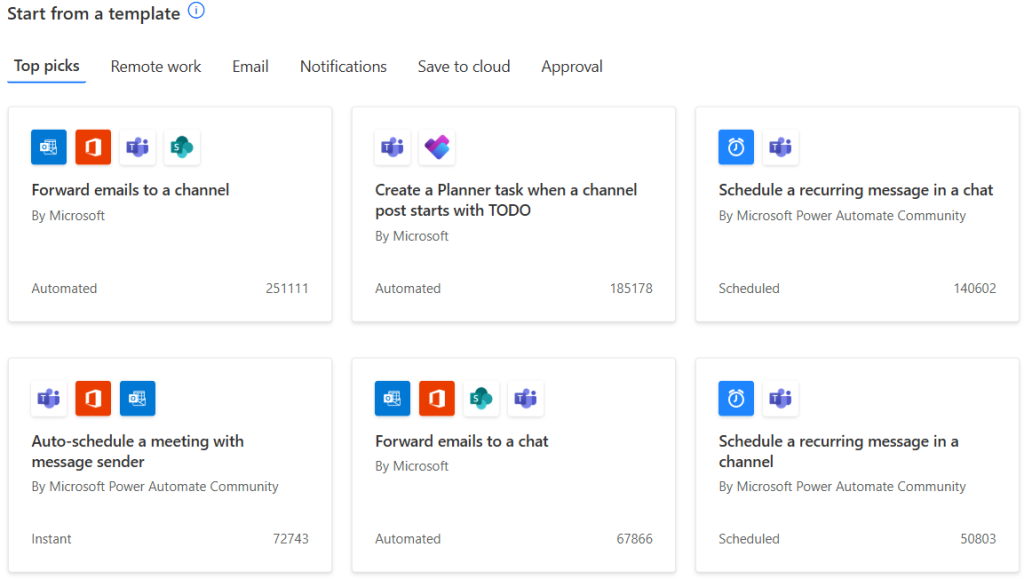
Why Start with a Template?
If you are new to Power Automate, starting with a template saves time and helps you understand how flows work. Templates are pre-designed flows that solve common problems, like saving email attachments or sending reminders.
This guide will help you create Power Automate flow easily by following these simple steps — perfect for beginners.
Step-by-Step Tutorial: Create Your First Power Automate Flow for Beginners
Step 1: Sign In to Power Automate
- Visit https://make.powerautomate.com.
- Log in using your Microsoft 365 credentials.
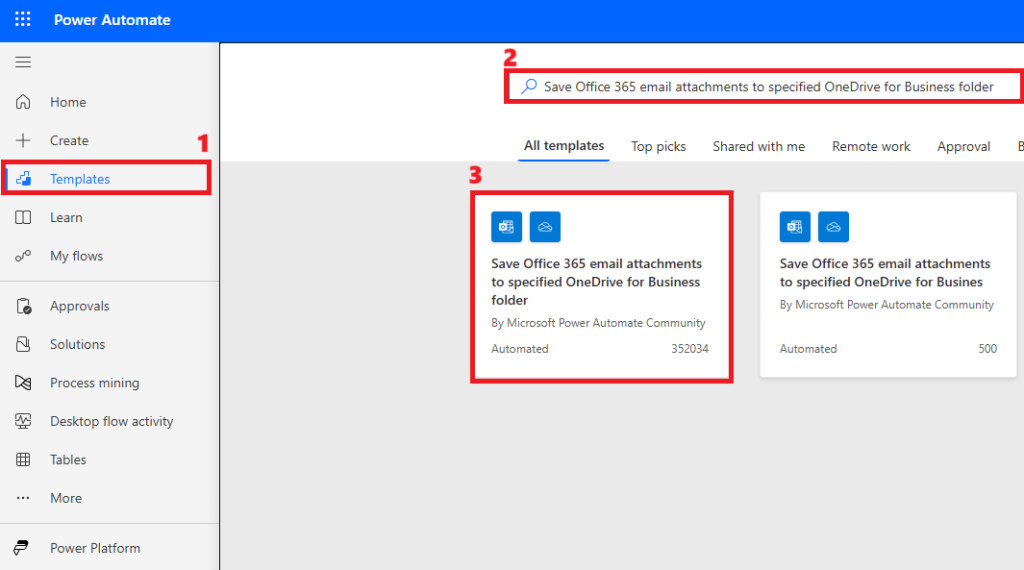
Step 2: Find a Template
- On the left panel, click Templates.
- Type “Save email attachments to OneDrive” in the search bar.
- Select the template titled “Save Office 365 email attachments to specified OneDrive for Business folder”.
- Note: OneDrive for Business is not the same as the personal OneDrive — they serve different purposes and have different storage systems. Similarly, Outlook for Office (part of Microsoft 365) is not the same as Outlook.com, which is a free web-based email service. Make sure you’re signed in with the correct business account when using templates like “Save Office 365 email attachments to specified OneDrive for Business folder.”
Step 3: Set Up Connections
- Connect your Outlook and OneDrive accounts by clicking Sign In.
- Grant the required permissions for Power Automate to access your files and emails.
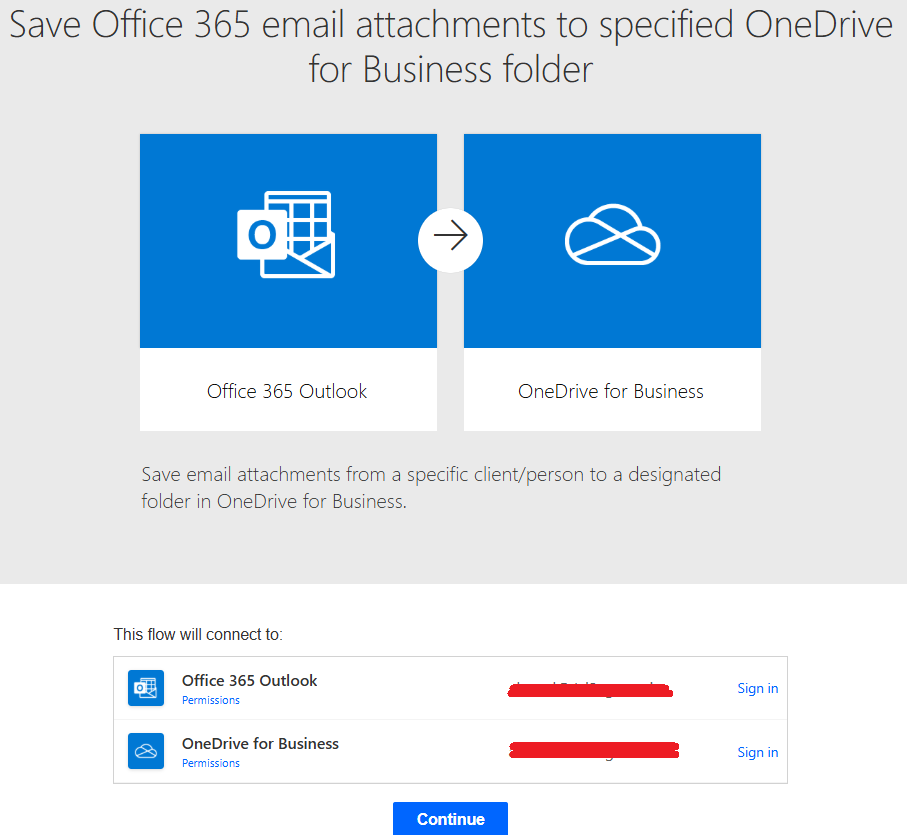
- Note: If you already have connections set up, they will appear automatically. Otherwise, click Sign In to connect your Outlook and OneDrive for Business accounts. If you haven’t used OneDrive for Business before, you might encounter a connection error. To resolve this, open OneDrive from the Microsoft 365 apps list at least once—this initializes the service and should allow the connection to work properly.
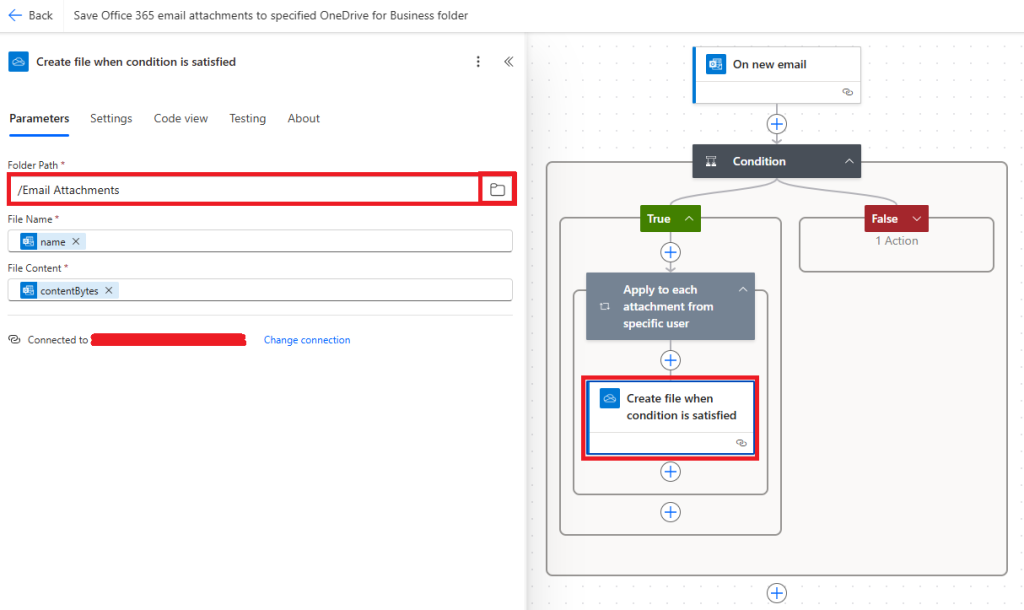
Step 4: Customize the Template (Optional)
- You can customize which folder in Outlook the flow watches (e.g., Inbox).
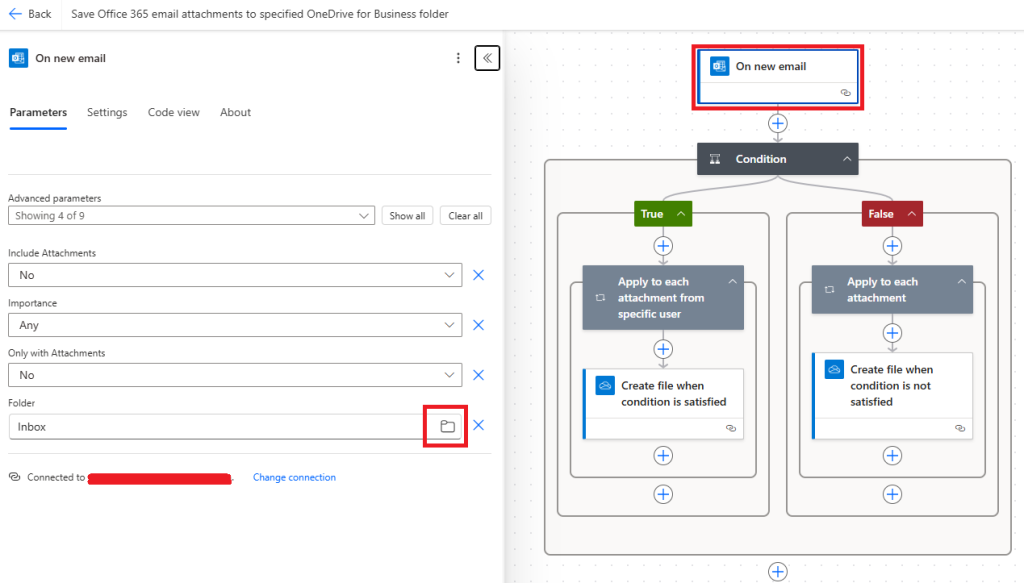
- Specify the folder in OneDrive where attachments will be saved.
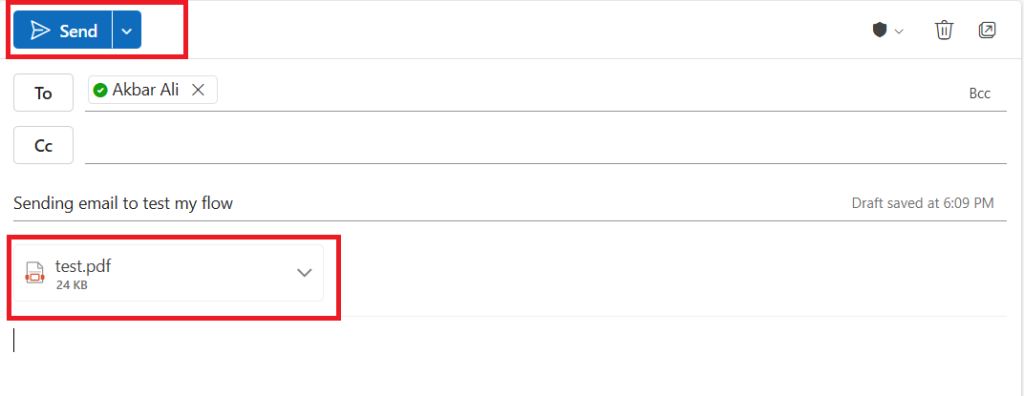
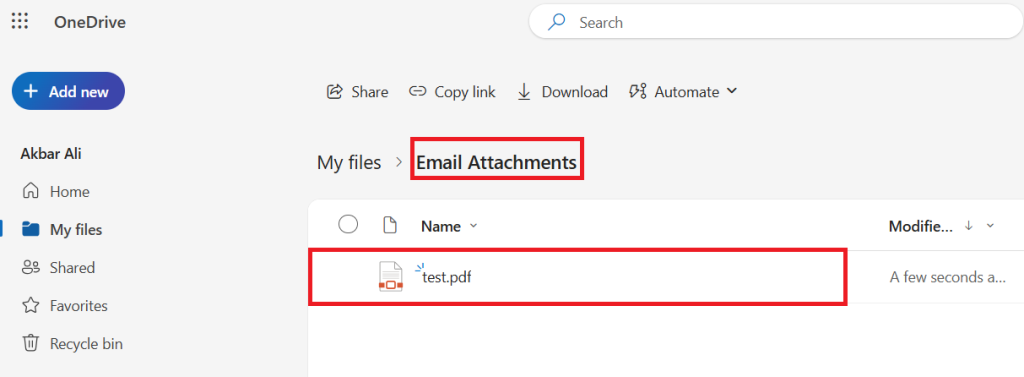
Step 5: Save and Test the Power Automate Flow
- Click Save.

- Test your new flow by sending yourself an email with an attachment.
- Check your OneDrive to confirm the file was automatically saved.
- After the email is sent, it may take a minute or two for the flow to run.
Step 6: Check Your Flow’s Performance
- Go to My Flows in Power Automate.
- Review the Run History to see if your flow ran successfully.
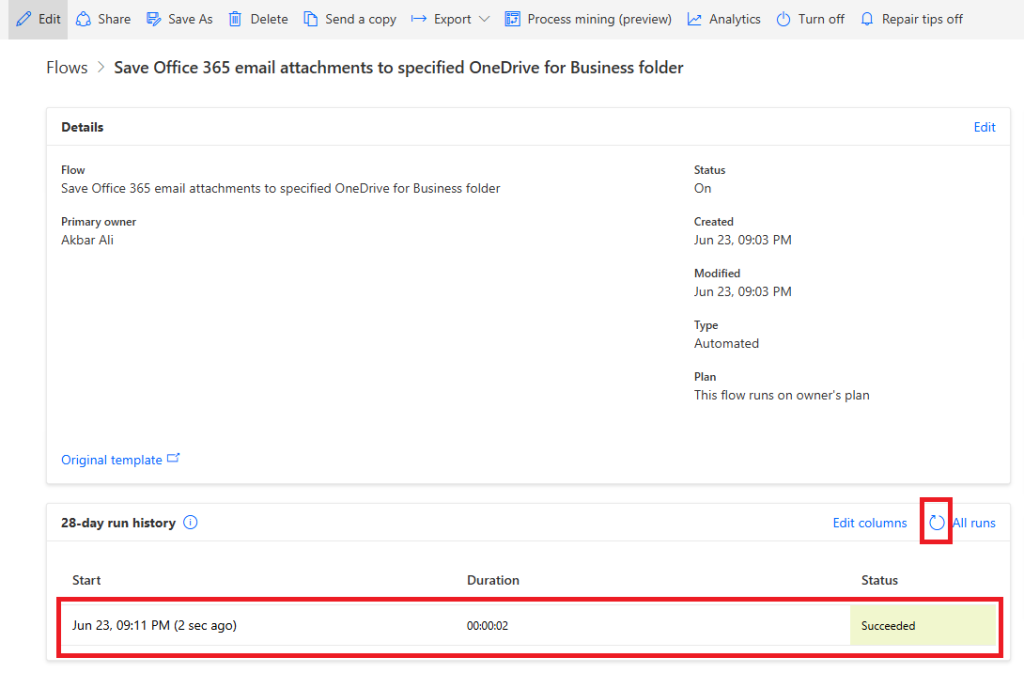
- After the email is sent, it may take a minute or two for the flow to run. You can click the refresh icon in Power Automate to check whether the flow has run successfully or if it has failed.
Why Power Automate Flow for Beginners is Perfect for New Users
- No Coding Skills Required:
Simple drag-and-drop interface. - Easy Integration:
Works with popular apps like Outlook, SharePoint, Excel, Teams. - Ready-Made Templates:
Hundreds of templates to automate repetitive tasks. - Save Time and Reduce Errors:
Let automation handle routine work for you.
Tips for Success When You Create Power Automate Flow
✔️ Start Small:
If you’re new, begin with simple templates like saving email attachments or sending notifications. Once you’re confident, you can create Power Automate flow that handles more complex multi-step processes across multiple services.
✔️ Test Thoroughly:
Always test your flows after creating them to ensure they run as expected. Testing allows you to identify errors early and make adjustments before deploying the flow in real scenarios.
✔️ Review and Improve:
Regularly check the flow’s run history and performance logs. This helps you spot failures, delays, or inefficiencies in your flows. Over time, you can tweak and optimize your flows for better reliability and faster execution.
✔️ Explore More Templates:
Power Automate offers hundreds of ready-made templates for tasks like approvals, reminders, file management, data collection, and notifications. As you gain experience, explore these templates to discover new ways to automate repetitive tasks and boost productivity.
✔️ Stay Updated with New Features:
Microsoft frequently updates Power Automate with new connectors, triggers, and features. To make the most of your flows, stay informed about these updates by visiting the official Power Automate blog or documentation. This will help you create Power Automate flow solutions that take advantage of the latest improvements.
Common Mistakes to Avoid When You Create Power Automate Flow
✔ Skipping Connections: Always connect your Microsoft services (Outlook, OneDrive) properly.
✔ Ignoring Flow Testing: Test each flow before using it in real scenarios.
✔ Overcomplicating Flows: Start simple; avoid multi-step flows initially if you’re a beginner.
By avoiding these mistakes, you can create Power Automate flow that runs smoothly without errors.
Conclusion: Your First Power Automate Flow for Beginners is Ready!
Congratulations! You’ve successfully created your first Power Automate Flow for Beginners. This is just the beginning.
Once you create Power Automate flow successfully, you can explore more advanced features like conditional triggers and multi-step automation..
Ready to automate more tasks? Visit the Power Automate Template Gallery and keep building smarter workflows.
For more beginner-friendly tips, check out our full Power Automate Beginner Guide: 7 Proven Tips for Beginners to Get Started Quickly and discover how to automate tasks effortlessly.
🧭 Where to Go Next?
If you want to level up your automation skills, check out:
You actually make it appear so easy along with your presentation but I
to find this topic to be actually something that I think I’d never understand.
It sort of feels too complex and very broad
for me. I’m having a look ahead on your subsequent submit,
I’ll attempt to get the cling of it!
Wow, this piece of writing is good, my sister is analyzing such things, therefore I am going
to let know her.
Hello! I could have sworn I’ve been to this website before
but after reading through some of the post I realized it’s new to me.
Anyways, I’m definitely happy I found it and
I’ll be book-marking and checking back frequently!
Hi, of course this piece of writing is in fact nice and I have learned lot of things from it on the topic of blogging.
thanks.
Your style is very unique compared to other people
I’ve read stuff from. I appreciate you for posting when you’ve
got the opportunity, Guess I’ll just book mark this web site.
Hi, the whole thing is going perfectly here and ofcourse every one
is sharing data, that’s really fine, keep up
writing.
Great site you have here.. It’s hard to find good quality writing like yours these
days. I honestly appreciate people like you! Take care!!
I am sure this piece of writing has touched all the internet visitors,
its really really nice article on building up new weblog.