
If you regularly receive invoices via email, manually downloading attachments and uploading them to SharePoint can be tedious and error-prone. In this beginner-friendly tutorial, you’ll learn how to Automate Invoice Email to SharePoint using Power Automate to save time, reduce effort, and boost accuracy.
📄 Use Case Overview
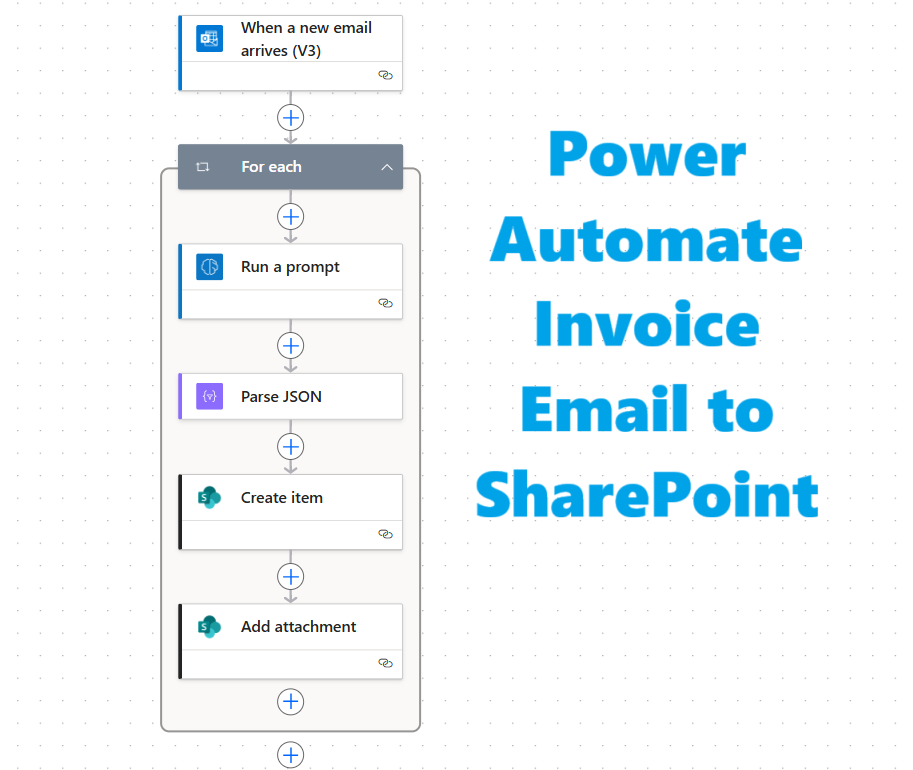
This automation flow will detect new invoice emails in your Outlook inbox, extract key invoice details using AI, and create a SharePoint list item with the attached invoice included.
Example scenario:
📥 Vendor sends an email with subject line “Invoice”
🤖 Flow runs automatically, extracts details such as Amount, Date, Client Name, and Summary
📊 A new item is created in your Invoices SharePoint list
📎 The original invoice file is added as an attachment
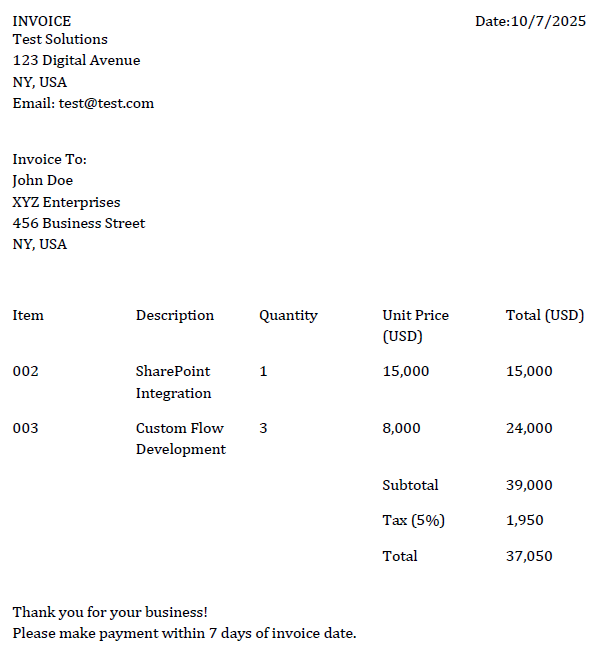
📸 Screenshot: Example of invoice email in Outlook
🎯 What You’ll Learn
By the end of this tutorial, you’ll be able to:
✅ Use the When a new email arrives (V3) trigger efficiently
✅ Apply AI prompts to extract invoice data automatically
✅ Parse structured data using Parse JSON
✅ Create SharePoint list items and attach files
✅ Optimize your flow using Include Attachments and Only with Attachments options
🧰 Prerequisites
Before you begin, make sure you have:
- A Microsoft 365 account with access to Power Automate
- A SharePoint site with a list named Invoices
- Columns: Amount, Date, Client Name, Summary
- An Outlook mailbox that receives invoice emails with attachments
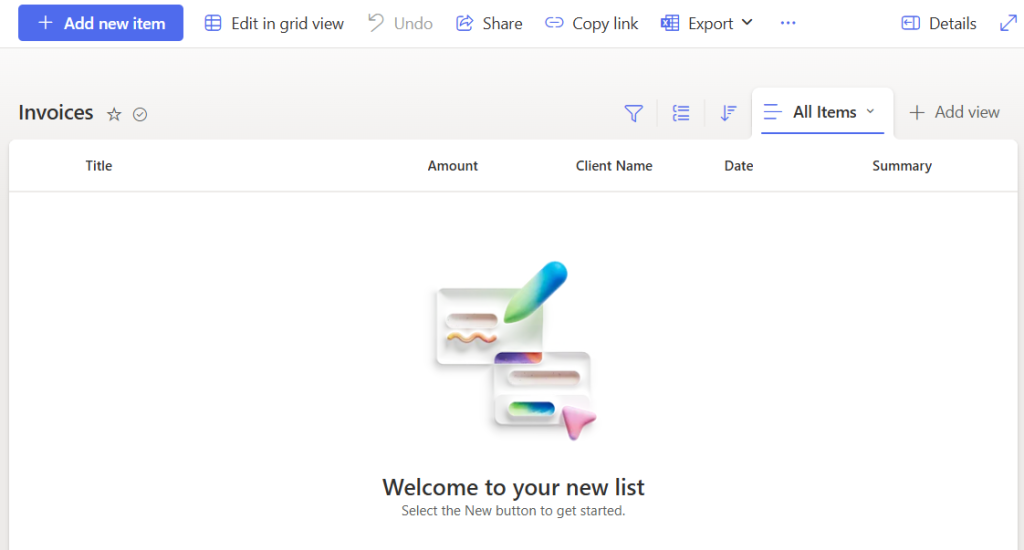
📸 Screenshot: Invoices list in SharePoint with columns
🪄 Step-by-Step: Automate Invoice Email to SharePoint
Step 1️⃣: Create a New Flow
- Go to make.powerautomate.com
- Click Create > Automated cloud flow
- Name your flow Invoice Processing
- Choose the trigger When a new email arrives (V3)
Step 2️⃣: Configure the Trigger
Set the following options carefully:
- Include Attachments: Yes
- Only with Attachments: Yes
- Subject Filter: Invoice
This ensures that the flow runs only for relevant invoice emails that contain attachments.
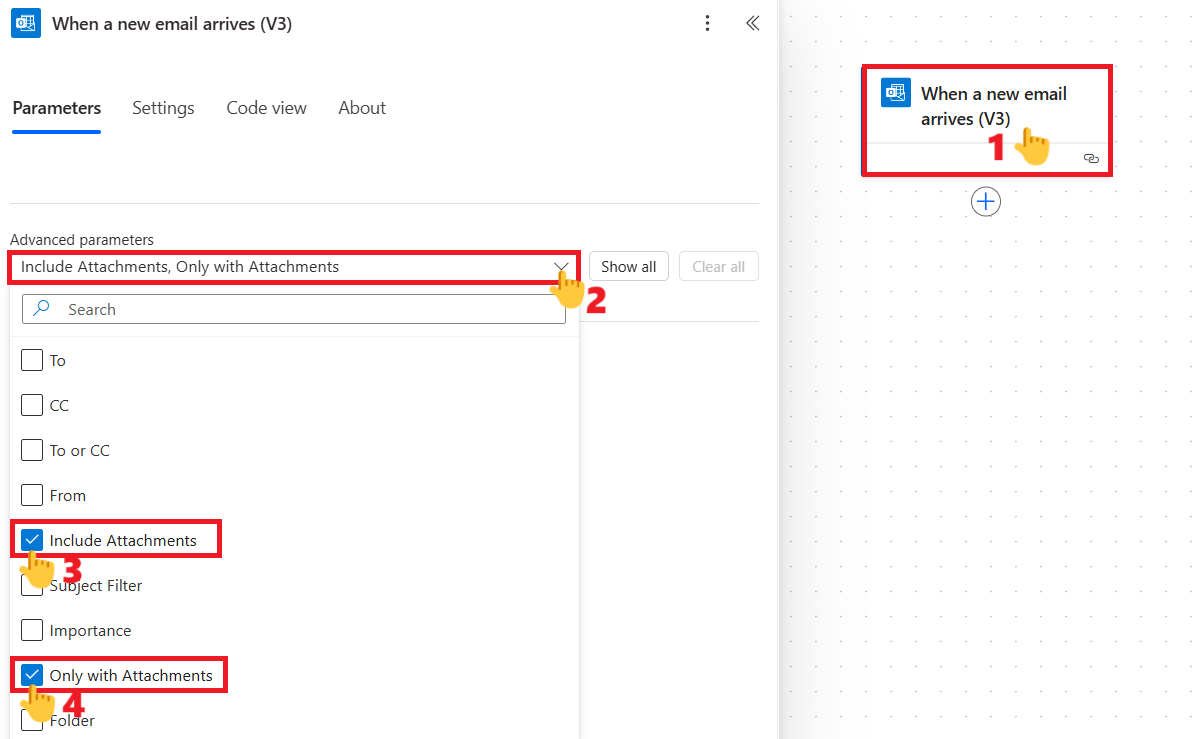
📸 Screenshot: Configuring Include Attachments and Only with Attachments
Step 3️⃣: Add “Run a Prompt” Action
Next, use the Run a Prompt action to extract invoice data from the attached file using AI.
To add a prompt there, click the Prompt dropdown and select New Custom Prompt.

📸 Screenshot: Run a prompt configuration
🧠 Prompt Example:
You are tasked with extracting key invoice data from the provided document. The goal is to identify and retrieve specific information accurately to facilitate further processing or analysis.
### Instructions:
1. Carefully analyze the attached invoice document.
2. Extract the following details:
– **Amount**: The total monetary value stated on the invoice.
– **Date**: The invoice issuance or billing date.
– **Client Name**: The name of the individual or organization billed.
– **Summary**: A brief description or overview of the invoice contents or purpose.
3. Ensure that the extracted data is accurate and corresponds exactly to the information in the document.
4. Present the extracted information in a clear, structured format.
### Output Format:
Provide the values exactly in the given JSON structure below. If any value is missing, return an empty string (“”) for that key. Ensure only the top-level keys and their corresponding values are included, with no inner objects or arrays.
“`json
{
“Amount”: “{extracted amount as a string}”,
“Date”: “{extracted date as a string}”,
“Client Name”: “{extracted client name as a string}”,
“Summary”: “{extracted summary as a string}”
}
“`
### Guidelines:
– Extract only from the provided document; do not infer or add information.
– If any field is missing or unclear in the document, indicate it with a null value or an empty string.
– Maintain the original formatting of dates and amounts as found in the document.
Provide the invoice document here:
Copy the prompt given above into the Instructions text area. Then place your cursor at the end of the prompt, click Add content, and select Image or document to insert the document input placeholder. Finally, click Save. You can also test the prompt before saving it.
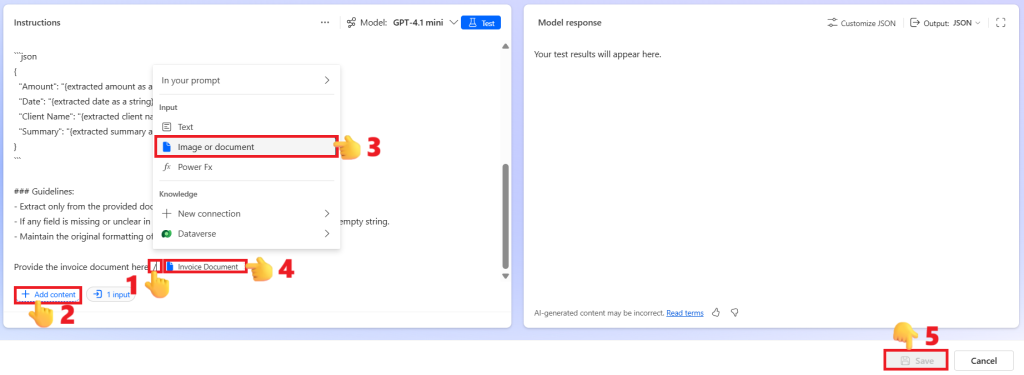
📸 Screenshot: Prompt configuration with input document placeholder
Attach the invoice file from the trigger:
- Input File: Attachments Content
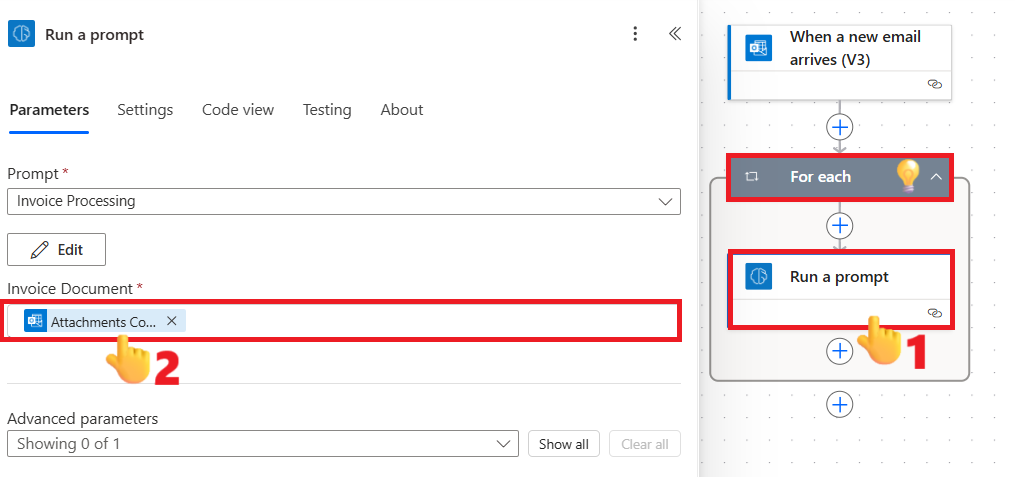
📸 Screenshot: Run a prompt configuration with attachment input
💡When you add the attachments content, Power Automate will automatically wrap the action inside a For each loop.
Step 4️⃣: Parse the JSON Output
Add a Parse JSON action to format the AI output.
Content:
replace(replace(outputs('Run_a_prompt')?['body/responsev2/predictionOutput']?['text'],'```json',''),'```','')
Schema:
{
  "type": "object",
  "properties": {
    "Amount": { "type": "string" },
    "Date": { "type": "string" },
    "Client Name": { "type": "string" },
    "Summary": { "type": "string" }
  }
}
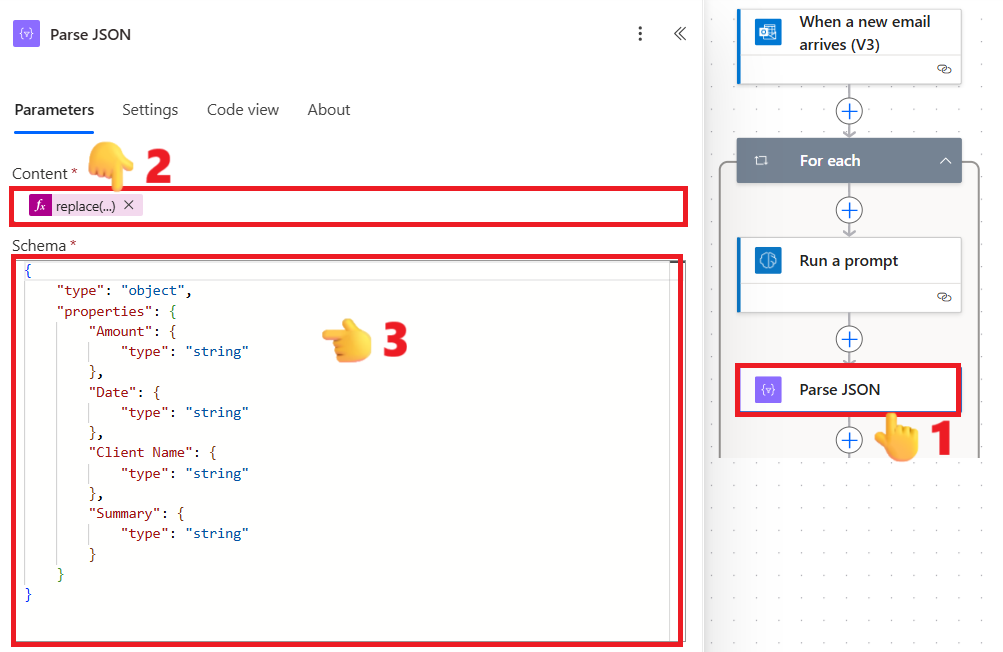
📸 Screenshot: Parse JSON action with schema configuration
Step 5️⃣: Create SharePoint Item and Add Attachment
- Create Item action
- Site Address: Your SharePoint site URL
- List Name: Invoices
- Amount: From Parse JSON → Amount
- Client Name: From Parse JSON → Client Name
- Date: From Parse JSON → Date
- Summary: From Parse JSON → Summary
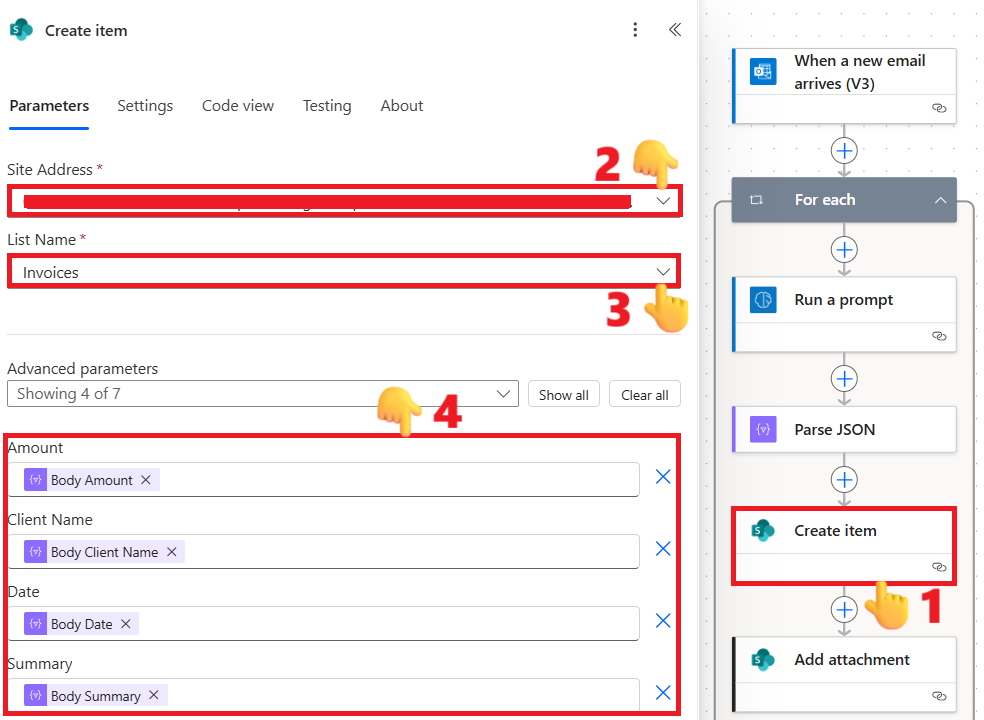
📸 Screenshot: Create Item actions configured in Power Automate
- Add Attachment action
- Site Address: Same site
- List Name: Invoices
- Id: From Create Item
- File Name: Attachment Name (from trigger)
- File Content: Attachment Content (from trigger)
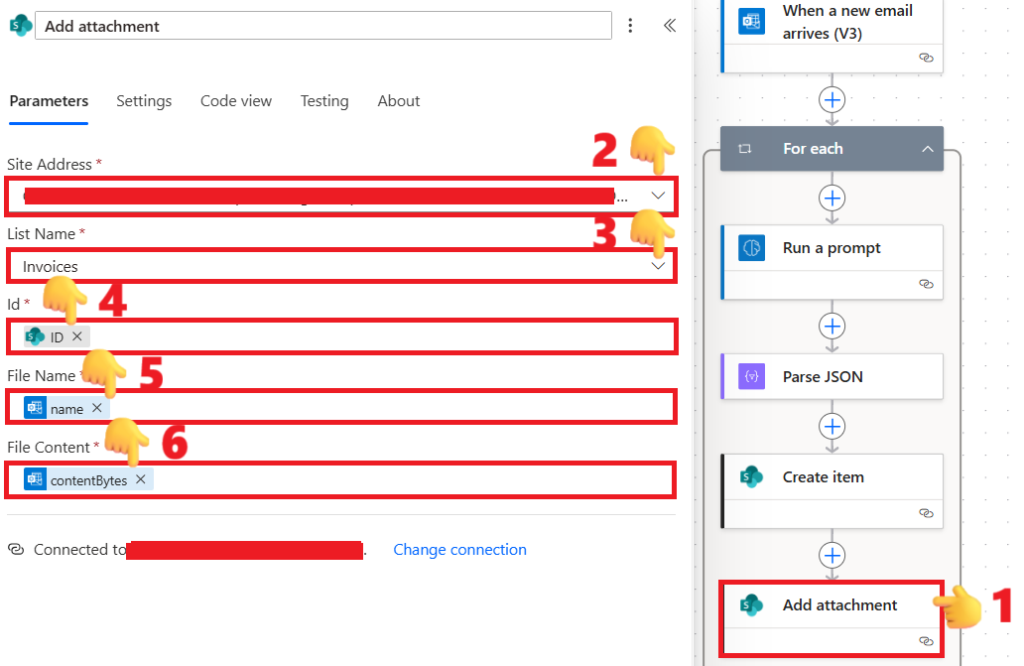
📸 Screenshot: Add Attachment actions configured in Power Automate
Conclusion
Congratulations! You’ve successfully built your first automation to Automate Invoice Email to SharePoint.
Now, every invoice email you receive will automatically create a SharePoint record, extract its details, and attach the invoice file – all hands-free.
Start small, and you’ll soon find Power Automate transforming your daily workflow.
🚀 Bonus
- 🚀Ultimate Power Automate Substring Function Explained – 6 Powerful Examples
- 🚀3 Effortless Steps to Save Email Attachments to Teams
- 🚀Master Power Automate AI Draft Reply Flow in 7 Steps for Effortless Email Replies