
If you’re looking for a smarter way to handle emails and convert them into actionable tasks, you’ll love this tutorial. In this guide, we’ll build a Power Automate Email to Task flow that automatically turns incoming emails with specific keyword into Planner tasks, while also storing and sharing the original email for future reference.
🚀 What You’ll Achieve
Using this Step-by-Step Power Automate Email to Task flow Guide, you’ll be able to:
- Detect incoming emails with the keyword “Request”
- Automatically create a Planner task with the email subject as the task title
- Convert the email body into clean text for the task description
- Export and save the original email file into SharePoint
- Generate a sharing link to the exported email
- Assign users to the task and include references for context
🧰 Prerequisites
To complete this Power Automate Email to Task flow Guide, make sure you have:
- Microsoft 365 with access to Power Automate
- Microsoft Planner
- A SharePoint Document Library (Planner automatically uses one in the backend)
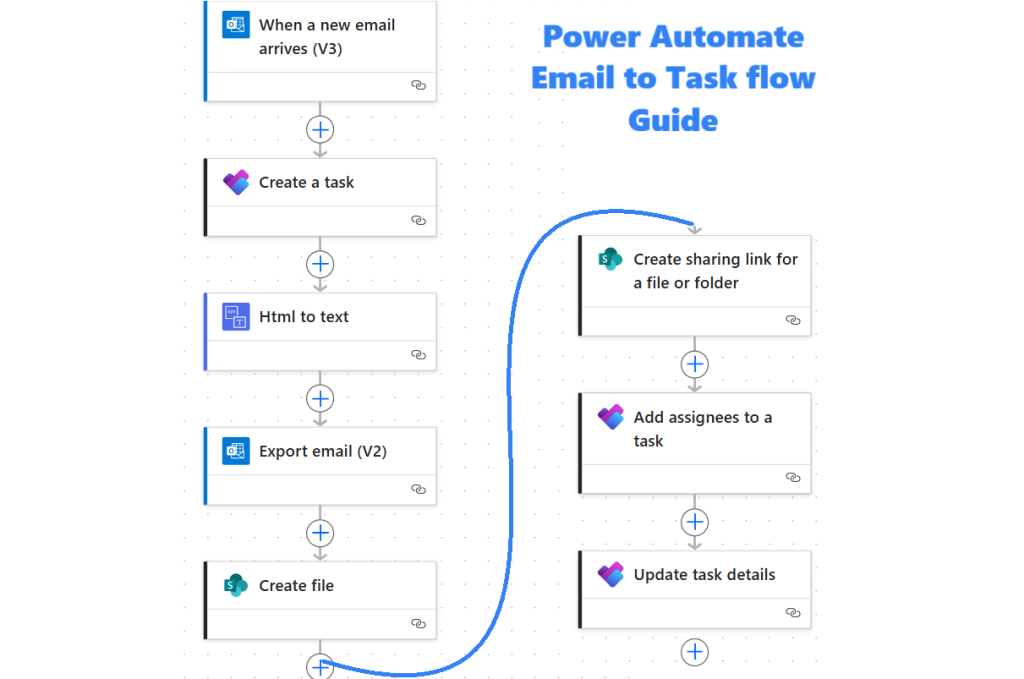
🧱 Step-by-Step Power Automate Email to Task flow
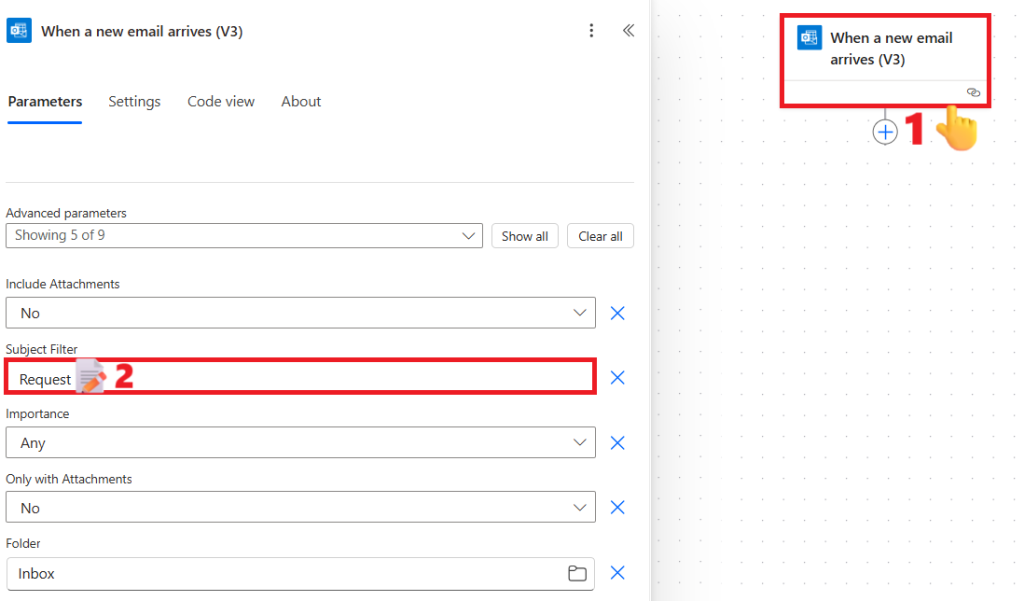
🔹 Step 1: Trigger – When a New Email Arrives (V3)
- Open Power Automate at make.powerautomate.com.
- Create a new Automated Cloud Flow.
- Set the trigger: When a new email arrives (V3).
- Subject Filter: only trigger if the email subject contains the keyword “Request”.
🔹 Step 2: Create a Task in Microsoft Planner
- Add action: Create a task.
- Group Id: Select a group from the dropdown.
- Plan Id: Select a plan from the dropdown.
- 👉 If no plan exists, go to Microsoft Planner and create a new plan by clicking the “New plan” button in the top-right corner.
- Title: Subject of the received email by clicking on the flash icon.

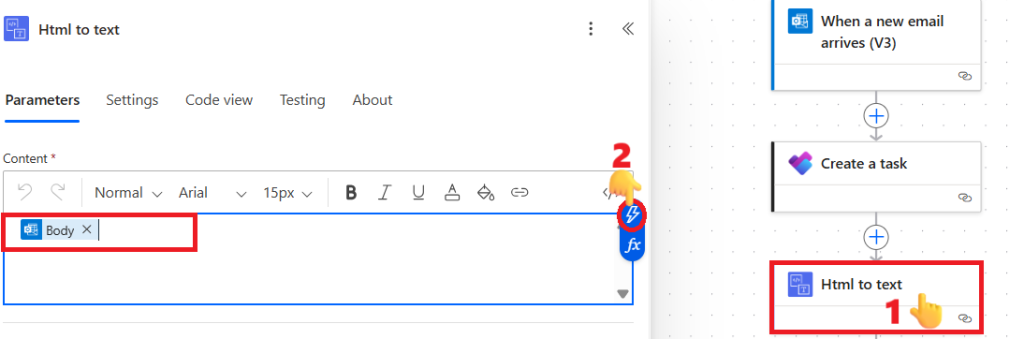
🔹 Step 3: Convert HTML to Text
- Add action: Html to text.
- Content: Email “Body” from trigger by clicking on the flash icon.
- This ensures your Planner task description is clean and readable.
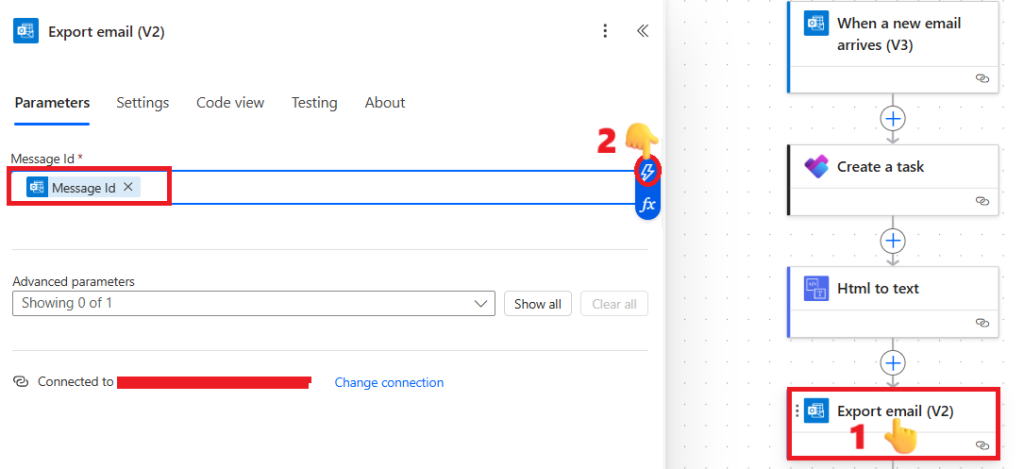
🔹 Step 4: Export Email (V2)
- Add action: Export email (V2).
- Message Id: Message Id from trigger.
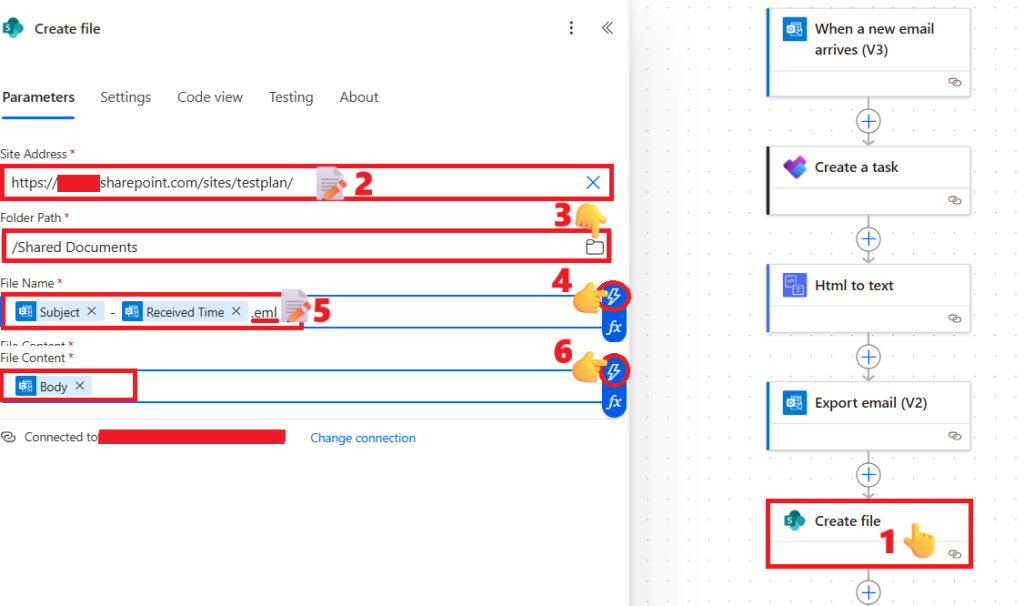
🔹 Step 5: Create File in SharePoint
- Add action: Create file.
- Site Address: Enter the SharePoint site address associated with the plan. Each plan in Microsoft Planner has a corresponding backend SharePoint site-typically named after the plan without spaces. For example, if your plan is named “Test Plan,” the site URL would follow this format:
https://<tenant>.sharepoint.com/sites/testplan.- If you’re unable to locate the specific plan site, you may use any other SharePoint site URL instead. Copy and paste the URL here. If it doesn’t appear in the dropdown, choose the option to add it as a custom value.
- Folder Path: Click the folder icon and select the document library where you want to save the email file.
- File Name: Use the format
Subject - Received Time.eml.
Click the lightning bolt (⚡) icon to open the dynamic content list, then select Subject.
Next, type a hyphen (-), and click the lightning bolt icon again to select Received Time.
Finally, type.emlto complete the file name. - File Content: Click the lightning bolt (⚡) icon and select the Body from the dynamic content of Export Email (V2).
- Site Address: Enter the SharePoint site address associated with the plan. Each plan in Microsoft Planner has a corresponding backend SharePoint site-typically named after the plan without spaces. For example, if your plan is named “Test Plan,” the site URL would follow this format:
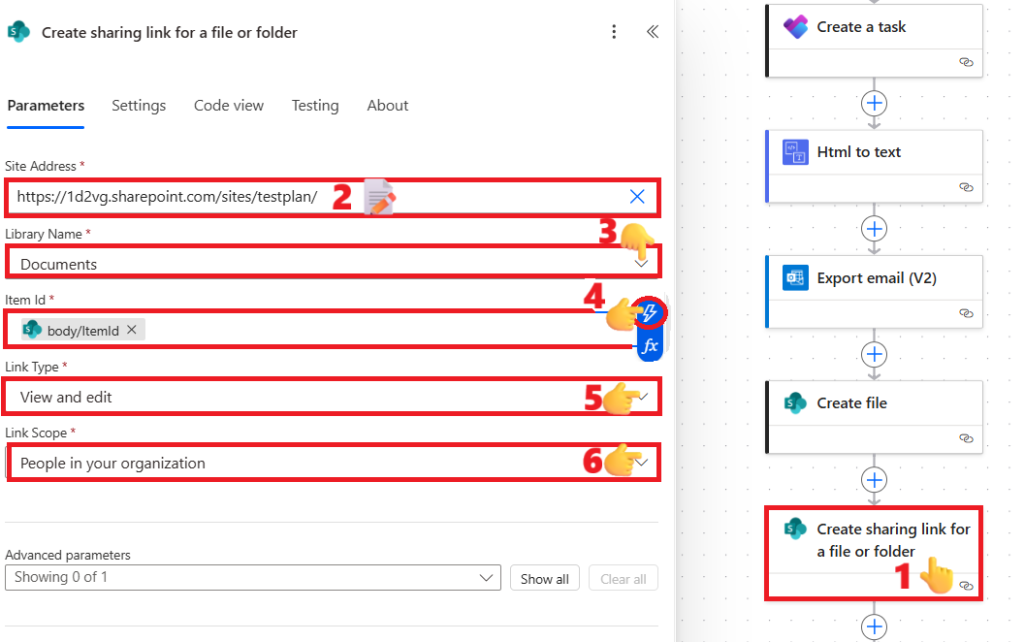
🔹 Step 6: Create Sharing Link
- Add action: Create sharing link for a file or folder.
- Site Address: Enter the same site address used in Step 5.
- Library Name: Select the name of the document library where the exported email was saved (as in Step 5).
- Item Id: Click the lightning bolt (⚡) icon and select the ItemId of the newly created file.
- Link Type: Choose either “View and edit” or “View only” from the dropdown menu.
- Link Scope: Choose either “People in your organization” or “Anyone with the link” from the dropdown menu.
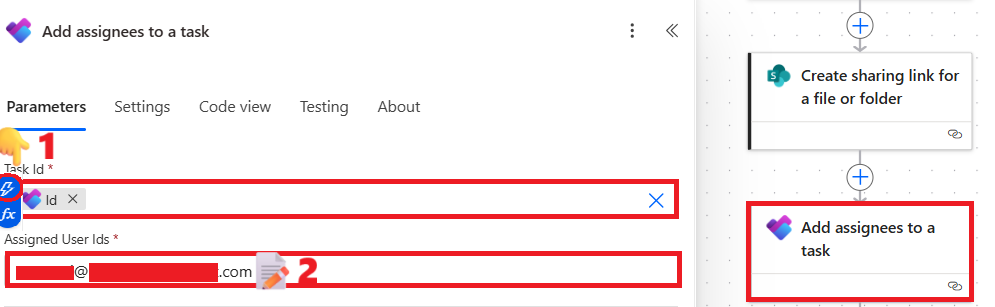
🔹 Step 7: Add Assignees to Task
- Add action: Add assignees to a task.
- Task Id: First, click on the dropdown and select “Enter custom value”. This will convert the dropdown into a text field.
Then, place your cursor inside the text field – a blue lightning bolt (⚡) icon will appear. Click on it and select the Id of the newly created task from the Create a task step.
- Task Id: First, click on the dropdown and select “Enter custom value”. This will convert the dropdown into a text field.

- Assigned User Ids: Enter your email address there.
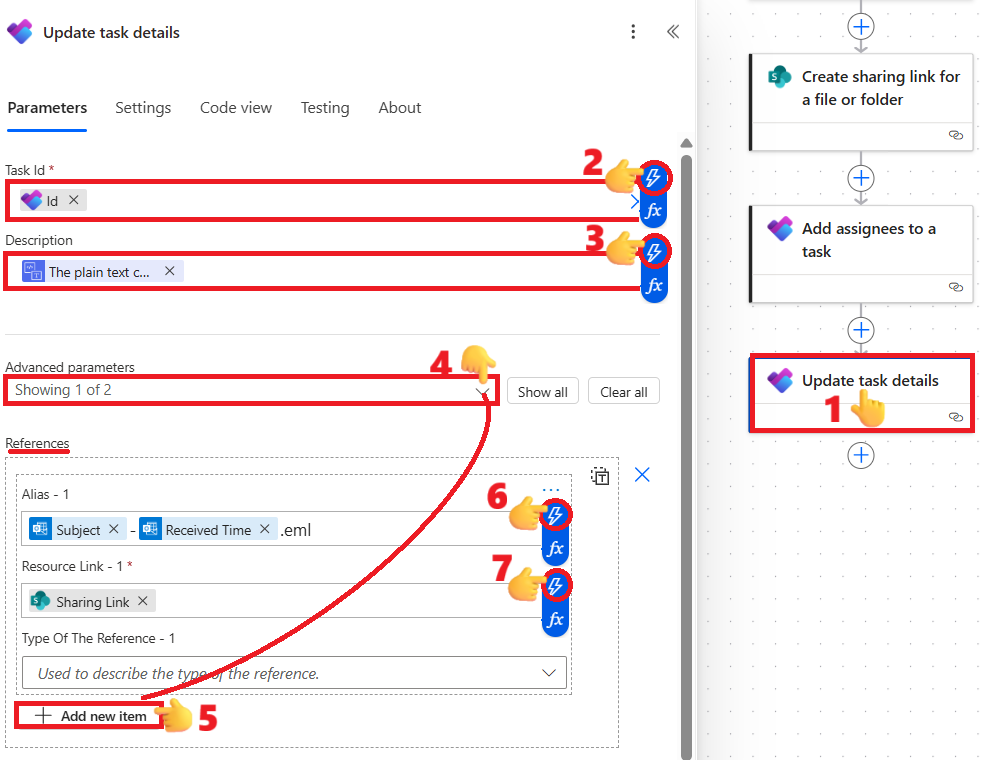
🔹 Step 8: Update Task Details
- Add action: Update task details.
- Task Id: Use the Id from the Create a task step. Follow the same steps as described in Step 7 to enter it.
- Description: Click the lightning bolt (⚡) icon and select “The plain text content” from the Html to text action.
- Expand the Advanced parameters section
- Select References
- Click Add new item
- Alias – 1:
Subject - Received Time.eml - Resource Link – 1: Use the Sharing Link obtained in Step 7
📈 Result
Now, whenever an email with the keyword “Request” arrives, this Power Automate Email to Task flow will:
- Create a Planner task with the subject as the title
- Add the email body as the description
- Export and save the full email file in SharePoint
- Generate and link a shareable reference back into the task
- Assign the task to the right people automatically
This Step-by-Step Power Automate Email to Task flow Guide will save your team countless hours by ensuring no important request email gets lost.
💡 Bonus Tips
- Use filters in the trigger to reduce unnecessary runs and streamline your Power Automate Email to Task setup.
- Use a shared Planner board for team-wide tracking when implementing your Power Automate Email to Task workflow.
- Archive emails in SharePoint for compliance and record-keeping as part of your Power Automate Email to Task strategy.
🏁 Wrapping Up
You’ve just built a complete Step-by-Step Power Automate Email to Task flow that transforms incoming emails into actionable Planner tasks, attaches references, and ensures accountability across your team. With this Power Automate Email to Task method, your workflow becomes smarter, faster, and more reliable.
📑 Bonus Resources
- 🚀 Effortless Power Automate Email Export in 5 Steps
- 🚀5 Easy Steps to Create a Power Automate Important Email Alert for Smarter Workflows
- 🚀 Quick Power Automate Email Alert SharePoint 4 Steps to Safeguard Documents
- ✨ Discover 3 Power Automate Triggers to Simplify Automation
- 🔄 Powerful Power Automate SharePoint Workflow 2025 for Easy Document Tracking
- 🚀 Master Automation with 6 Power Automate Date Time Actions