
If you’re tired of manually replying to routine emails, the AI Draft Reply Flow can save you time. In this guide, you’ll build a flow that receives an email, sends its content to OpenAI, and creates a professional draft reply automatically in the same conversation thread.
🎯 What You’ll Achieve
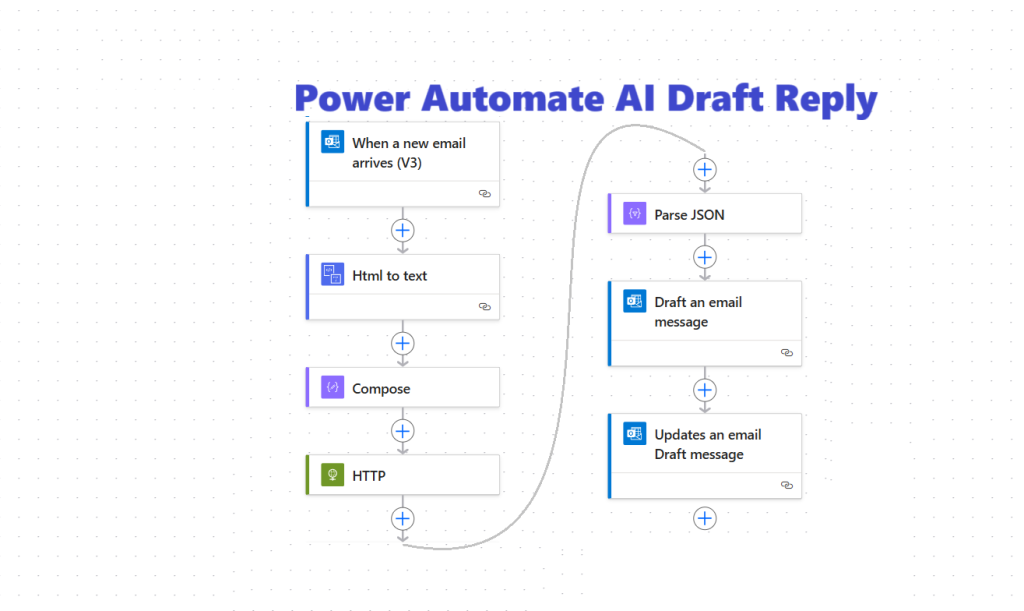
By following the AI Draft Reply Flow Steps, you will:
- Capture new emails based on a subject filter
- Convert the email body HTML to plain text
- Send the cleaned text to OpenAI API to generate a reply
- Parse the AI’s JSON output
- Draft a reply email automatically
- Update the draft to include the full AI-generated content
🧰 Prerequisites
- A Microsoft 365 account with Power Automate
- OpenAI account & API key
- If you don’t already have an account, sign up at https://platform.openai.com/signup.
- After signing in, go to https://platform.openai.com/account/api-keys to create and copy your API key.
⚠️ If your account has no free credits you’ll need to add a payment method to purchase credits before the flow can work.
🧱 Step-by-Step: Build the AI Draft Reply Flow
🔹 Step 1: Create a New Automated Flow
- Go to make.powerautomate.com
- Click Create > Automated Cloud Flow
- Name it: AI Draft Reply Flow
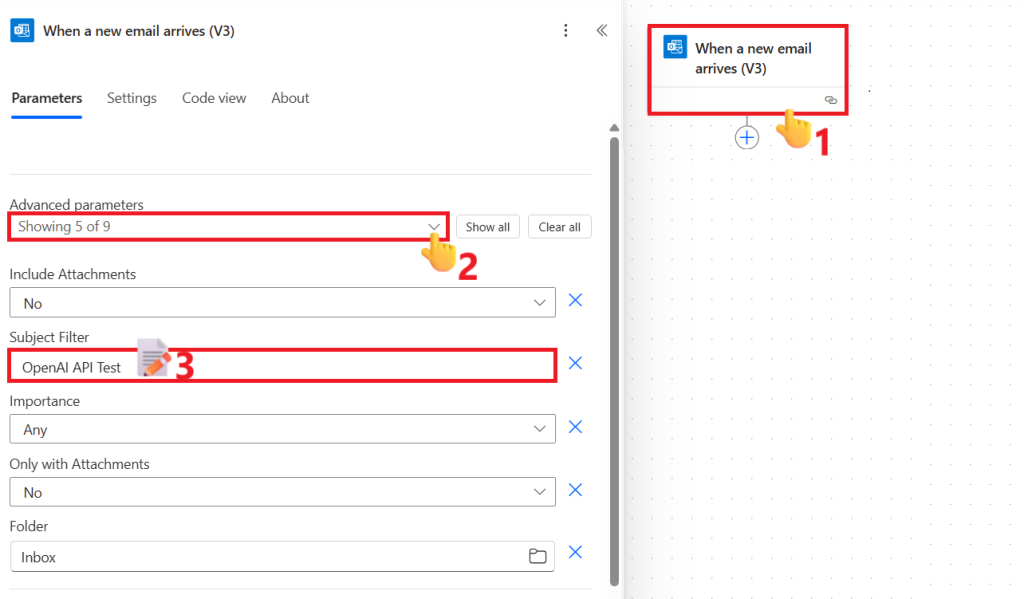
- Choose trigger: When a new email arrives (V3)
- Add a subject filter:
- Click “Advanced parameters” and select “Subject Filter” to display it.
- Subject Filter: Enter “OpenAI API Test”. This filter is only for testing so the flow runs on a limited number of emails. You can change the subject filter to match your own keyword or remove it entirely if you want the flow to run on all incoming emails.
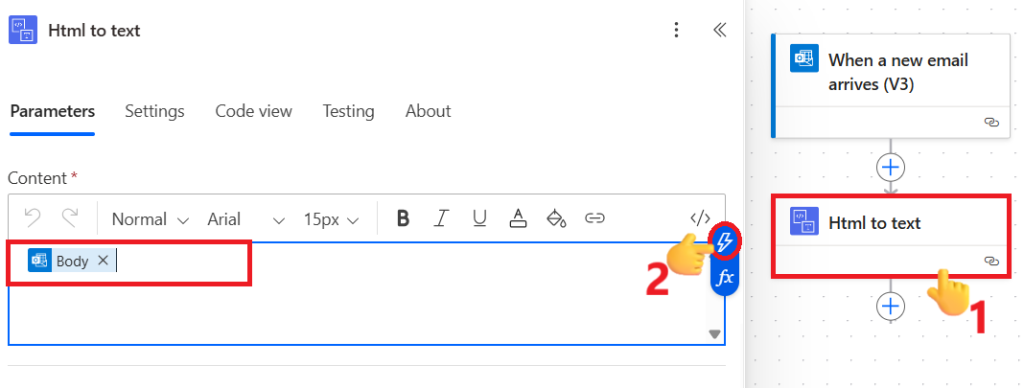
🔹 Step 2: Convert Email Body from HTML to Text
Add an action: Html to text
- Content: Click the flash icon, then from the dynamic content list select Body from under the trigger “When a new email arrives (V3)”
This ensures the AI receives clean text.
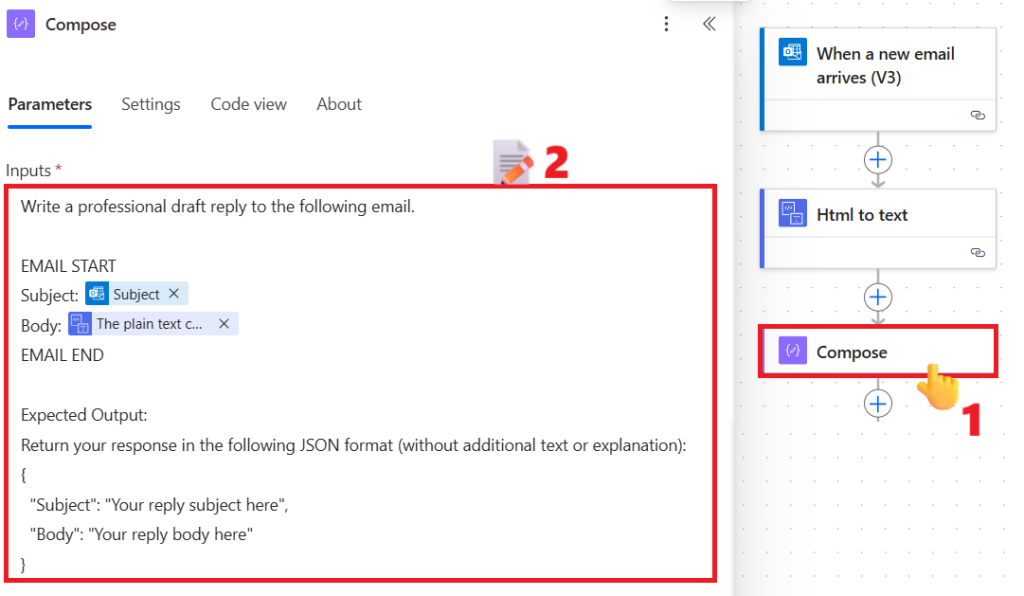
🔹 Step 3: Compose Prompt for OpenAI
Add an action: Compose with the text below. Copy and paste the entire block into the Compose action.
If the dynamic contents don’t appear automatically, click the flash icon and select the items from the dynamic content list.
– Subject comes from the trigger’s dynamic content.
– Body comes from the Html to text action’s output.
Write a professional draft reply to the following email.

EMAIL START
Subject: @{triggerOutputs()?['body/subject']}
Body: @{body('Html_to_text')}
EMAIL END

Expected Output:
Return your response in the following JSON format (without additional text or explanation):
{
  "Subject": "Your reply subject here",
  "Body": "Your reply body here"
}
This prompt tells the AI exactly what to return.
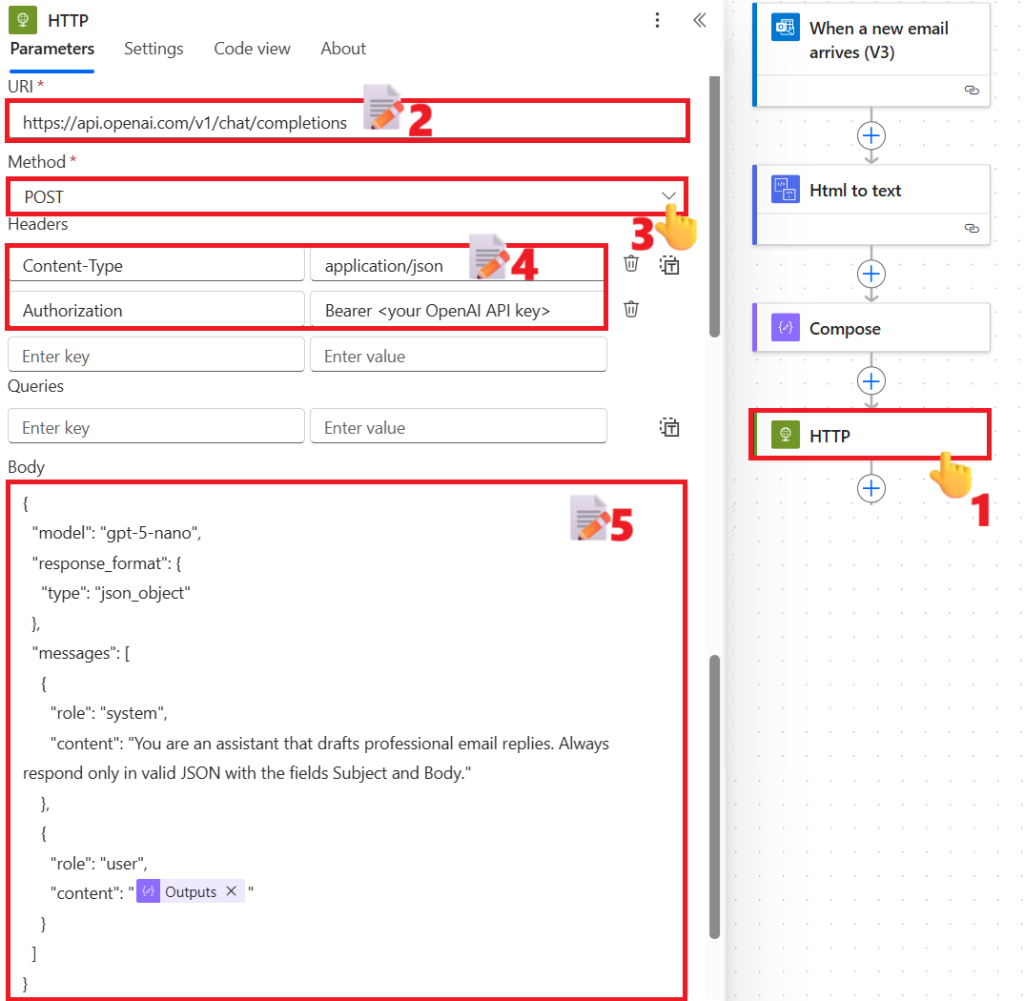
🔹 Step 4: Call OpenAI API via HTTP
Add an action: HTTP
- Method: POST
- URL:
https://api.openai.com/v1/chat/completions - Headers:
Content-Type:application/jsonAuthorization:Bearer <your OpenAI API key>
- Body: Copy and paste the entire block there.
If the dynamic content doesn’t appear automatically, click the flash icon and choose the items from the dynamic content list.
– The Output comes from the Compose action’s dynamic content.
{
  "model": "gpt-5-nano",
  "response_format": {
    "type": "json_object"
  },
  "messages": [
    {
      "role": "system",
      "content": "You are an assistant that drafts professional email replies. Always respond only in valid JSON with the fields Subject and Body."
    },
    {
      "role": "user",
      "content": "@{outputs('Compose')}"
    }
  ]
}
This sends the email content to OpenAI for an AI-generated draft.
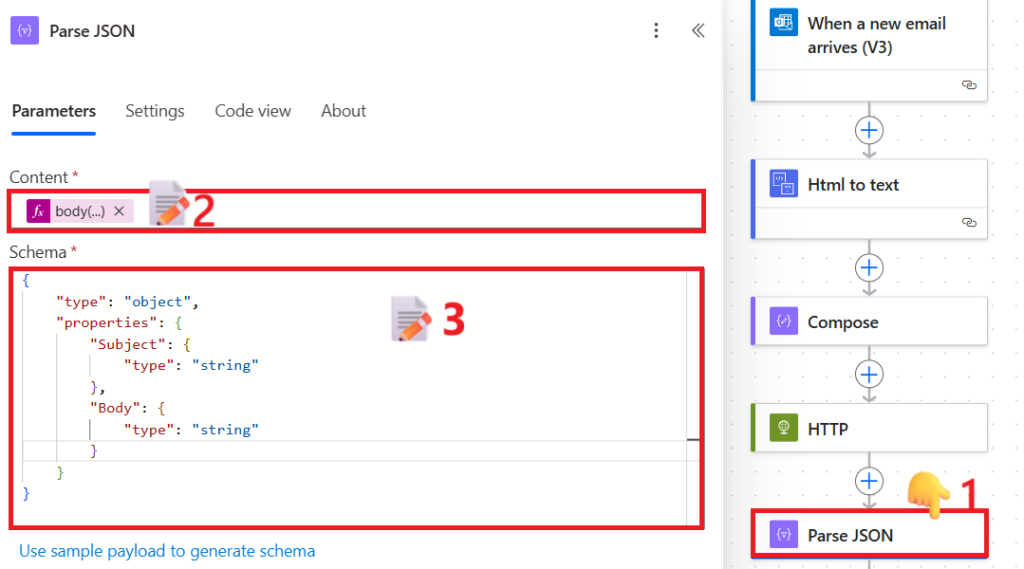
🔹 Step 5: Parse the JSON Response
Add an action: Parse JSON
- Content: Copy and paste the expression below.
If you rename the HTTP action to something else, update the expression accordingly – replace any spaces in the new action name with underscores.@{body('HTTP')['choices'][0]['message']['content']} - Schema: Copy and paste the JSON schema below into the action.
{
  "type": "object",
  "properties": {
    "Subject": {
      "type": "string"
    },
    "Body": {
      "type": "string"
    }
  }
}
This extracts the Subject and Body from the AI’s JSON.
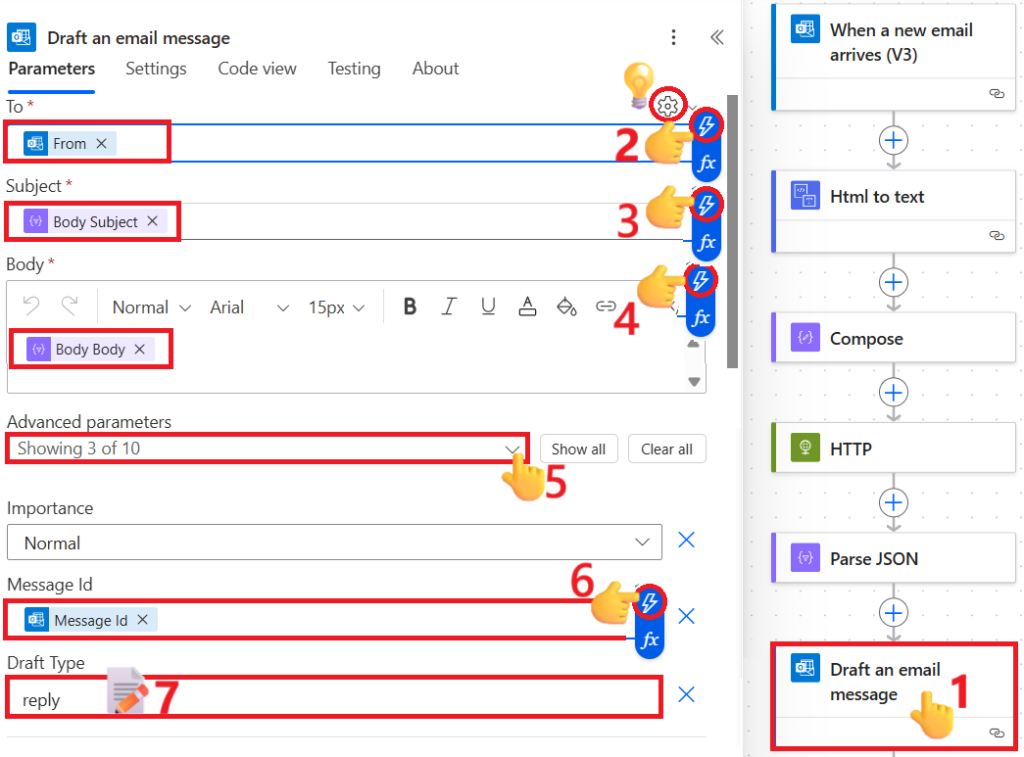
🔹 Step 6: Draft an Email Message
Add an action: Draft an email message
Copy and paste the following expression into each field – or place your cursor in a field, click the flash icon, and select the value from the dynamic content list.
💡For the To field, if the flash icon isn’t showing, first click the gear icon and switch it to “Use dynamic content”.
- From:
@{triggerOutputs()?['body/from']} - Subject:
@{body('Parse_JSON')?['Subject']} - Body:
@{body('Parse_JSON')?['Body']} - Advanced Params > Message Id:
@{triggerOutputs()?['body/id']} - Draft Type: reply
This creates the draft reply in the same conversation thread, but sometimes the body content isn’t saved. To fix this, we’ll use the “Update the Draft Email” action in the next step.
🔹 Step 7: Update the Draft Email (Fix Empty Body)
Add an action: Update an email draft message
Copy and paste the following expression into each field – or place your cursor in a field, click the flash icon, and select the value from the dynamic content list.
💡For the To field, if the flash icon isn’t showing, first click the gear icon and switch it to “Use dynamic content”.
- Message Id:
@{outputs('Draft_an_email_message')?['body/Id']} - To:
@{triggerOutputs()?['body/from']} - Subject:
@{body('Parse_JSON')?['Subject']} - Body:
@{body('Parse_JSON')?['Body']}
This ensures the draft reply body actually contains the AI content.
📈 Bonus Tips for AI Draft Reply Flow
- Use additional filters (From address, importance) to refine which emails trigger the flow.
- Add logging to a SharePoint list for each AI-generated reply.
- Monitor API usage to stay within OpenAI limits.
🏁 Wrapping Up
Your Power Automate AI Draft Reply is now ready. Every time a matching email arrives, Power Automate will call OpenAI, draft a professional reply, and save it as a reply draft in the same thread – saving you hours of manual work.