
If you often receive files that need to be converted, saved, and shared manually, Power Automate can make your life much easier. In this tutorial, you’ll create a simple yet powerful flow for File Conversion and Sharing that can handle everything automatically-from converting uploaded files to PDF, saving them in OneDrive, and even posting them in a Teams channel.
🧰 Prerequisites
Before starting, ensure you have:
- Access to Microsoft 365 and Power Automate
- A SharePoint Document Library to store files
- A mailbox to send notifications
🧱 Step 1: Create a Manually Triggered Flow
- Go to make.powerautomate.com
- Select Create > Instant cloud flow
- Name your flow:
File Conversion and Sharing Flow - Select Manually trigger a flow as the trigger
- Click Create
Now, add the following input parameters:
- File Content (File) – The file you want to upload
- Convert to PDF (Yes/No)
- Save in OneDrive (Yes/No)
- Send to Teams Channel (Yes/No)
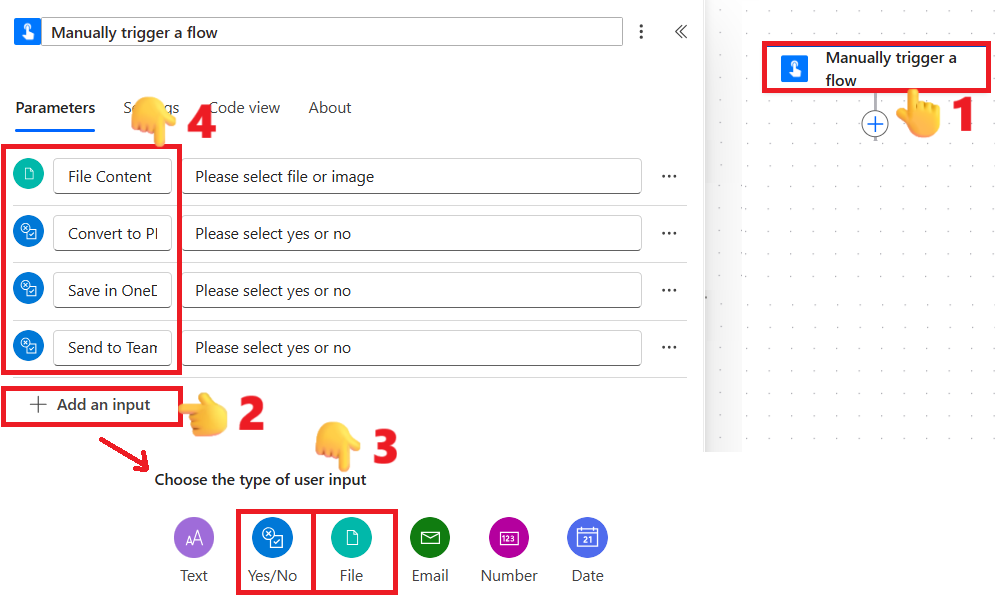
These parameters will control the flow’s actions for File Conversion and Sharing.
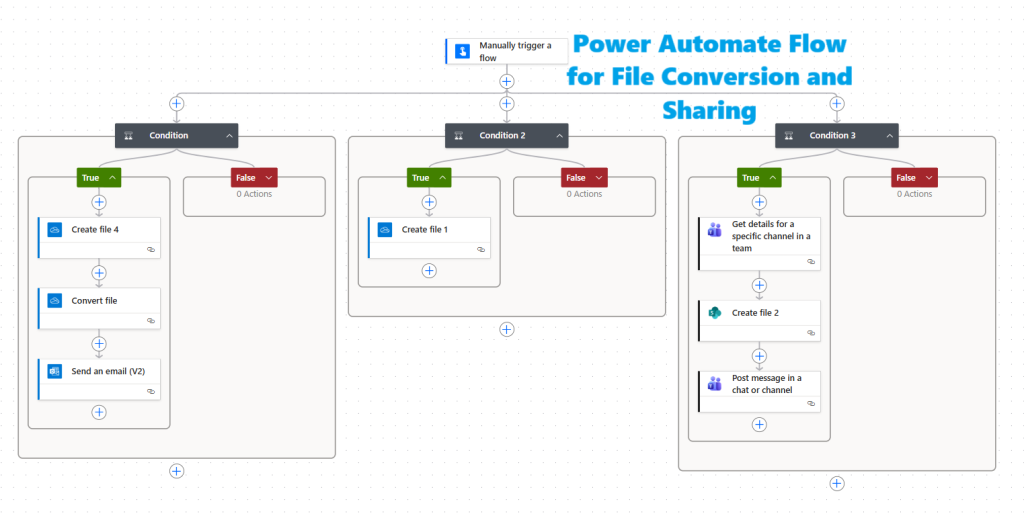
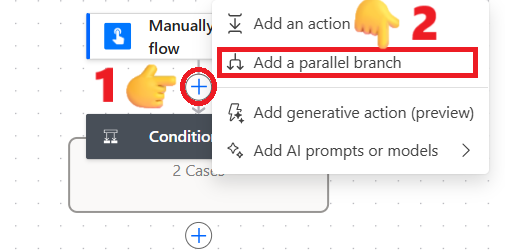
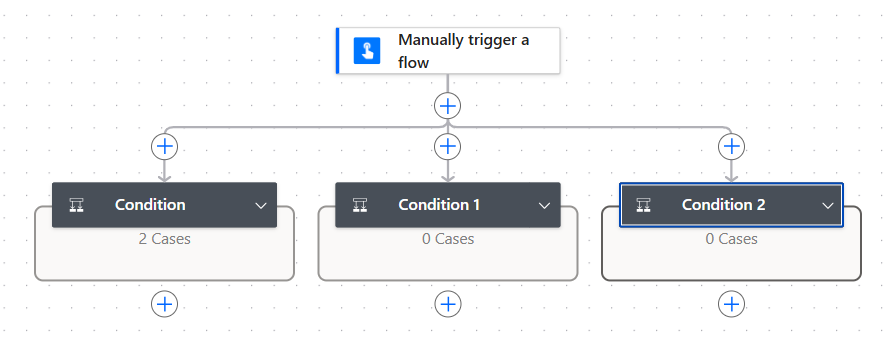
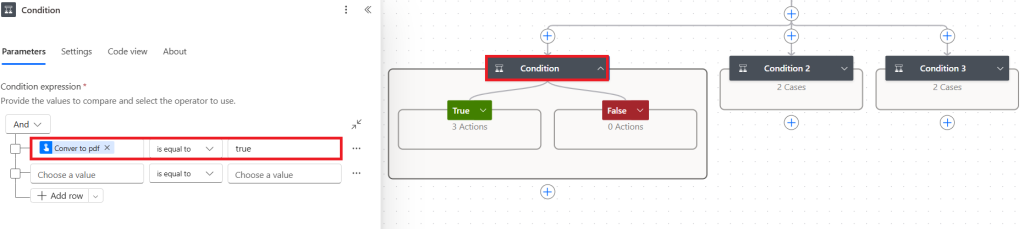
⚙️ Step 2: Add Three Parallel Condition Actions
After the trigger, add a Condition action, then right-click the plus (+) icon above it and select “Add a parallel branch” to add two more conditions running in parallel.
Once all three conditions are set in parallel, it will look like this. Next, we’ll configure the condition expression in each one as shown in the steps below.
🔹 Condition 1: Convert to PDF
Condition expression:
Set the condition to Convert to PDF is equal to true. Here, Convert to PDF is the parameter from the trigger. You can select it by placing your cursor in the field and clicking the dynamic content (flash) icon.
✅ If True:
Here, we’re using the following actions to convert the file to PDF and then send it as an email attachment.
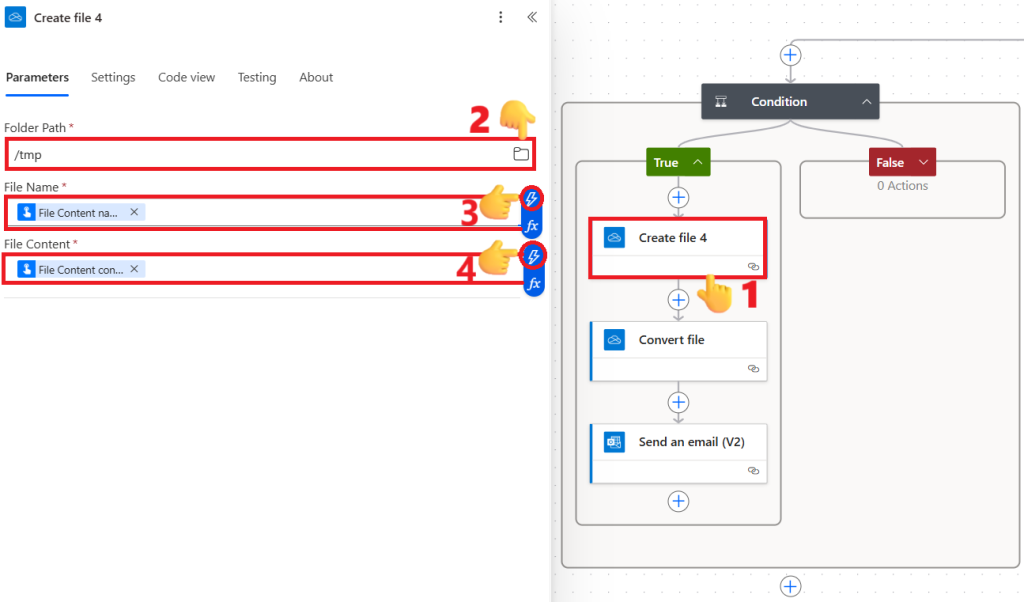
- Create file (OneDrive)
First, we need to create the file in OneDrive within a folder-for example, a temporary /tmp folder.
Set the parameters as shown below. You can either copy and paste the expressions for File Name and File Content provided below or select them from the dynamic content list by clicking the flash icon after placing your cursor inside the field. These two dynamic contents come from the File parameter of the trigger.
- Folder Path:
/tmp - File Name:
@{triggerBody()?['file']?['name']} - File Content:
@{triggerBody()?['file']?['contentBytes']}
- Folder Path:
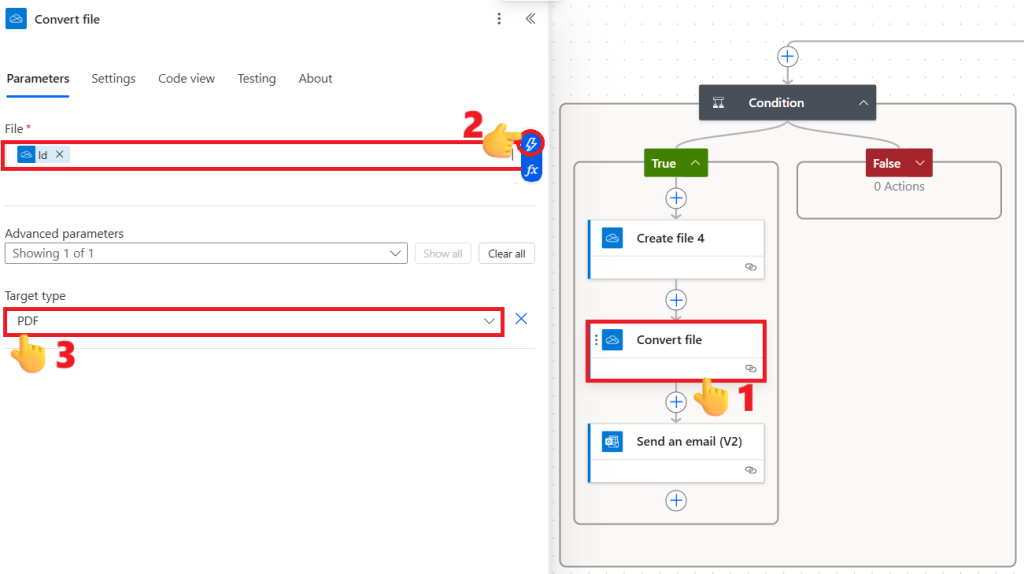
- Convert file (OneDrive)
This action is used to convert Word, Excel, and text files to PDF. Since we cannot directly use the uploaded file here, we first created the file in the previous action within the /tmp folder and are now using it for conversion.
Set the parameters as shown below. You can either copy and paste the expressions for Id provided below or select them from the dynamic content list by clicking the flash icon after placing your cursor inside the field.- File:
@{outputs('Create_file_4')?['body/Id']} - Target Type:
PDF
- File:
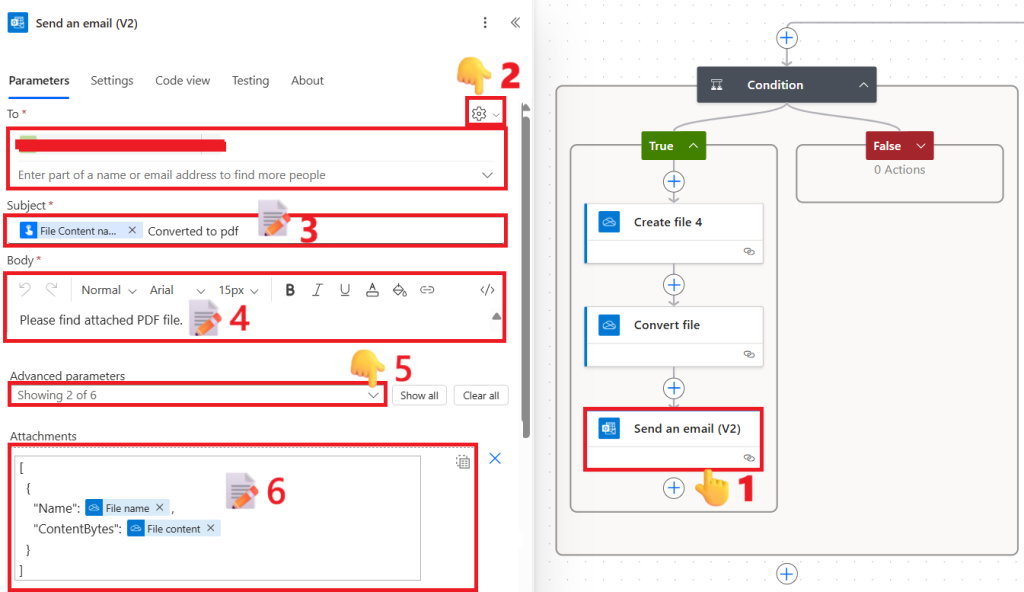
- Send an email (V2) to share the converted PDF
- To: Your email address
- Subject:
@{triggerBody()?['file']?['name']} Converted to PDF - Body:
Please find attached PDF file. - Attachments:
[ { "Name": @{outputs('Convert_file')?['headers/x-ms-file-name']}, "ContentBytes": @{body('Convert_file')} } ]
This branch completes the file conversion part of your File Conversion and Sharing flow.
🔹 Condition 2: Save in OneDrive
Condition expression:
Set the condition to Save in OneDrive is equal to true. Here, Save in OneDrive is the parameter from the trigger. You can select it by placing your cursor in the field and clicking the dynamic content (flash) icon.
✅ If True:
Here, we’re using the following action to save the file to a selected folder in OneDrive.
Create file (OneDrive)
- Folder Path:
/From My Flow - File Name:
@{triggerBody()?['file']?['name']} - File Content:
@{triggerBody()?['file']?['contentBytes']}
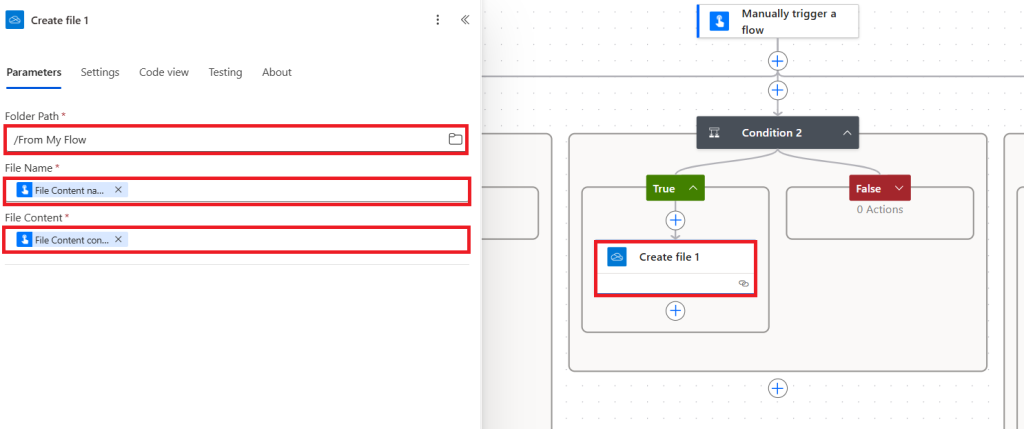
This saves the uploaded file directly into your OneDrive folder as part of the File Conversion and Sharing workflow.
🔹 Condition 3: Send to Teams Channel
Condition expression:
Set the condition to Send to Teams Channel is equal to true. Here, Send to Teams Channel is the parameter from the trigger. You can select it by placing your cursor in the field and clicking the dynamic content (flash) icon.
✅ If True:
Here, we’re using the following actions to upload the file to a Teams channel and then post a message about it.
- Get details for a specific channel in a team
- Select your Team and Channel from dropdowns
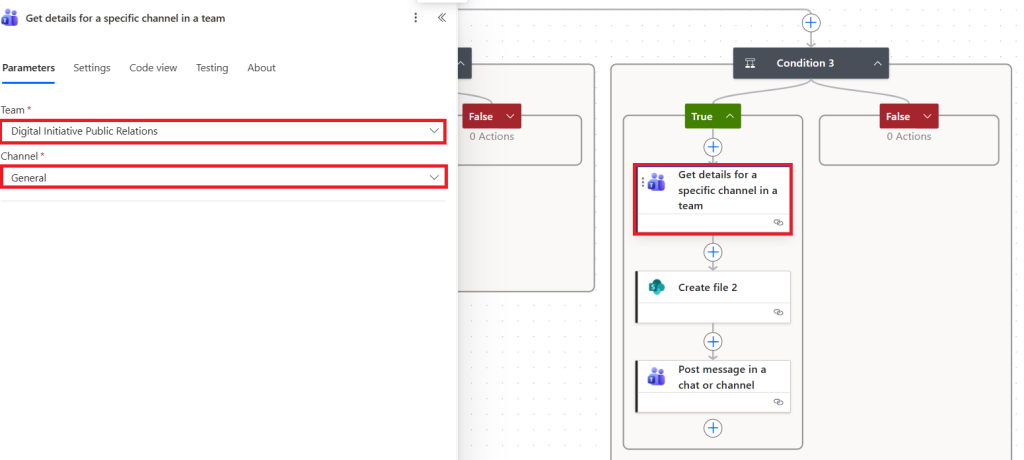
The above action provides the URL of the SharePoint site behind the selected Teams channel, which we will use in the next action below.
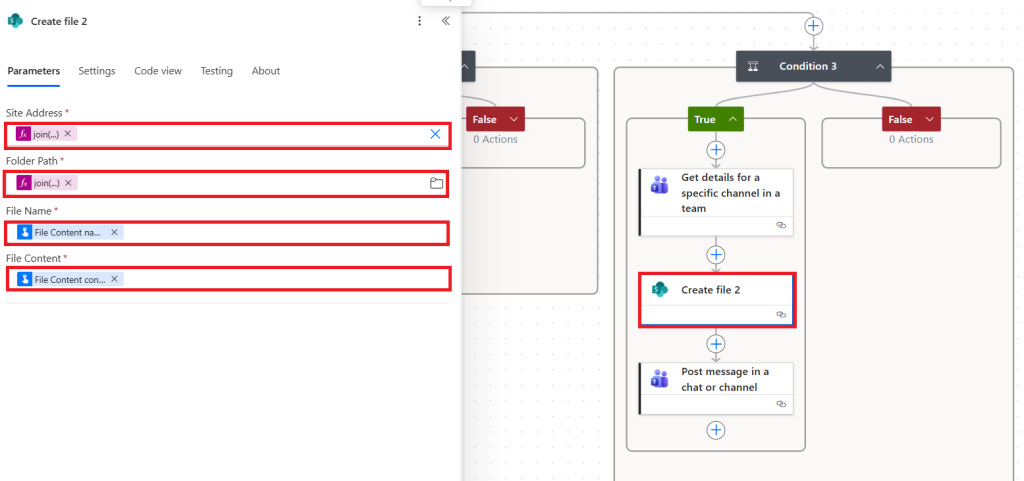
- Create file (SharePoint) – this will upload to the Teams channel’s connected SharePoint site.
Copy and paste the expressions provided below into the respective fields. For Site Address and Folder Path, we are using the URL from the previous action, “Get details for a specific channel in a team”, and applying several functions to extract and set the site address and folder path accordingly.
- Site Address:
@{join( take( split(outputs('Get_details_for_a_specific_channel_in_a_team')?['body/filesFolderWebUrl'], '/'), sub(length(split(outputs('Get_details_for_a_specific_channel_in_a_team')?['body/filesFolderWebUrl'], '/')), 2) ), '/' )} - Folder Path:
@{join( skip( split(outputs('Get_details_for_a_specific_channel_in_a_team')?['body/filesFolderWebUrl'], '/'), sub(length(split(outputs('Get_details_for_a_specific_channel_in_a_team')?['body/filesFolderWebUrl'], '/')), 2) ), '/' )} - File Name:
@{triggerBody()?['file']?['name']} - File Content:
@{triggerBody()?['file']?['contentBytes']}
- Site Address:
- Post message in a chat or channel
Once the file is uploaded, we use this action to post a message in the Teams channel.
- Post as: User
- Post in: Channel
- Team: Select same team
- Channel: Select same channel
- Message: First, click the </> tool to switch to HTML mode, then copy and paste the expression below in HTML format.
<a href="@{concat(outputs('Get_details_for_a_specific_channel_in_a_team')?['body/filesFolderWebUrl'],'/',outputs('Create_file_2')?['body/Name'])}">@{triggerBody()?['file']?['name']}</a>
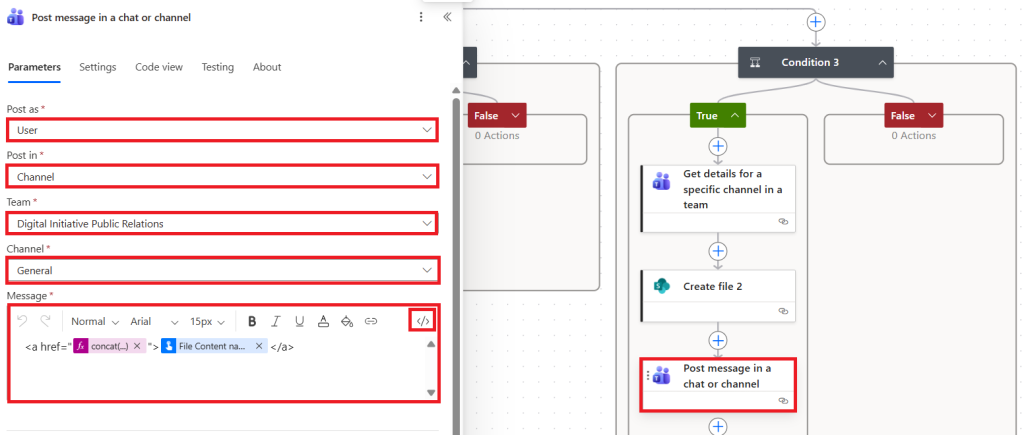
This completes the sharing portion of your File Conversion and Sharing process.
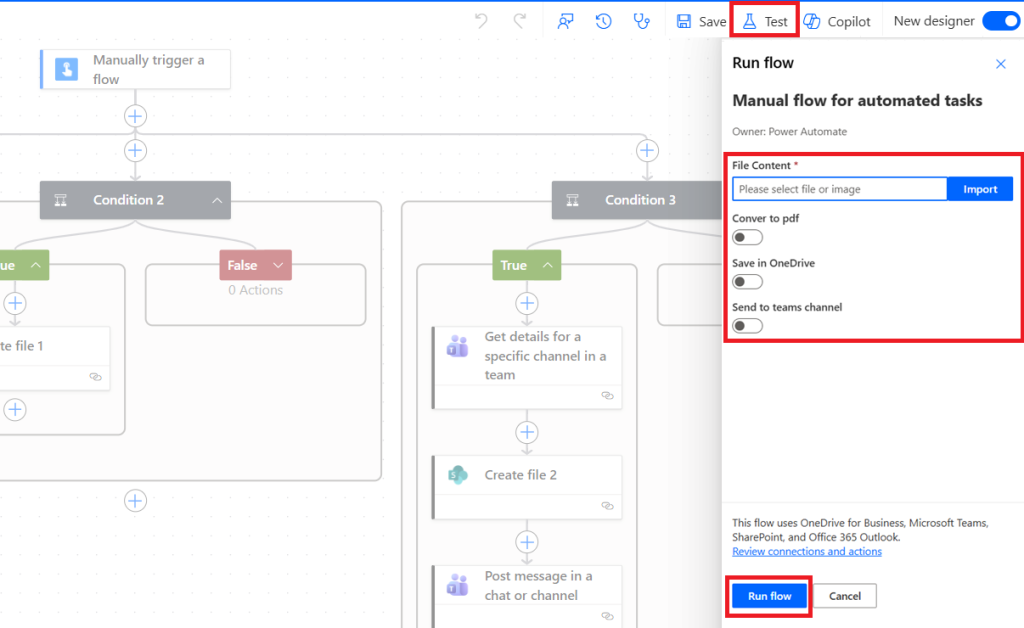
🧩 Step 3: Test Your Flow
- Click Test > Manually
- Upload a sample file and select Yes for desired actions
- Run the flow and verify:
- Converted PDF arrives by email
- File appears in OneDrive
- File and message post in the Teams channel
🎯 Result
You now have a reusable File Conversion and Sharing flow that can:
✅ Convert any uploaded file to PDF
✅ Save the original or converted file in OneDrive
✅ Share files automatically in a Teams channel
All triggered manually with just one click.
💡 Bonus Tips
- 🧠 Use folder cleanup to clear the
/tmpdirectory periodically. - 📎 You can add dynamic email recipients or Teams mentions to improve collaboration.
- ⚡ Convert this manual flow into an automated trigger (like when a new file is added to a SharePoint library) to scale your File Conversion and Sharing process even more.
🏁 Wrapping Up
This File Conversion and Sharing tutorial demonstrates how easy it is to automate repetitive document handling with Power Automate. With one manual trigger, your flow can convert, store, and share files seamlessly across Microsoft 365 services-saving you time and clicks every day.